

A Honda wheel center cap decal can refresh the look of your wheels, but only if its size and shape suit the cap already on the vehicle. A decal that is too large, too small, or off-center can make the finish look uneven. Before choosing a design, inspect the cap and measure the surface where the decal will sit.
Start with the center cap, not the wheel’s overall size. Compare the cap’s usable face with the decal’s listed dimensions, and check whether curves, raised edges, or recesses affect the placement area. Then decide whether you want a cosmetic overlay or a replacement cap. They serve different purposes.
This guide explains how to compare decal options, check fit, prepare the surface, and apply the decal carefully. The practical rule is simple: measure the actual cap, confirm the surface can support an overlay, and align the decal before pressing it down.
Key Takeaways
- A center cap overlay changes the cap’s appearance. It won’t repair a damaged cap or replace a missing one.
- Measure the usable face of the existing cap, not the full wheel, before comparing decal dimensions.
- Choose between an overlay and a replacement cap based on the cap’s condition and the result you want.
- For a clean Honda wheel center cap decal application, start with a dust-free, dry surface and align carefully before pressing it down.
- Compare the My IPG Honda overlay with your cap’s condition, usable face, dimensions, and intended appearance.
What a Honda Wheel Center Cap Decal Changes, and What It Does Not
A Honda wheel center cap decal is an overlay that adheres to the visible face of an existing center cap. It refreshes the cap’s appearance, but does not change the wheel’s function. Unlike a replacement cap, a decal does not provide a new cap body or replace a missing part.
The center cap sits at the wheel’s center. It is separate from the wheel and the lug nuts that secure the wheel to the vehicle. The hub is behind the wheel. Although these parts are close together, they have different roles. Treat a decorative decal as a cosmetic update, not a repair.
Honda Motor Co., Ltd. has a long history as a vehicle manufacturer, as outlined in this Honda overview. For decal fit, however, the important detail is the wheel and cap actually installed on your vehicle. A model name alone does not establish that every wheel has the same cap shape or usable surface.
Where the decal sits on a Honda wheel
The decal adheres to the exposed face of the center cap, not the full wheel or the area around the lug nuts. The face may be flat, curved, recessed, or bordered by a raised edge. Each feature affects the usable area and how evenly an overlay can sit. Inspect the cap itself rather than assuming one decal size suits every Honda wheel.
When an overlay is, and is not, the right choice
An overlay can refresh a faded, scuffed, or visually mismatched cap if the cap is present and has a suitable surface. It can change the visible design without replacing the whole cap. My IPG’s IPG Decal Honda Center Cap Overlay Wheel Tire Decals are made for this type of appearance update. Compare the product details with your cap before choosing.
Inspect the cap before applying anything. A loose, cracked, badly chipped, or missing cap needs attention as a cap issue, not a decal fix. An overlay will not rebuild damaged material, secure a cap that does not stay in place, or replace a part that is not there. Applying one over an uneven or compromised surface can also affect the finished appearance.
The surface matters, too. Dirt, residue, damage, and an irregular cap face can make clean placement harder. A secure cap with a clean, usable face is a better starting point. Choose a decal to change the visible finish. Choose a replacement part when the cap itself is damaged or absent. This distinction helps you set expectations before comparing dimensions, designs, and application steps.
How to Check Honda Center Cap Decal Fit Before You Buy
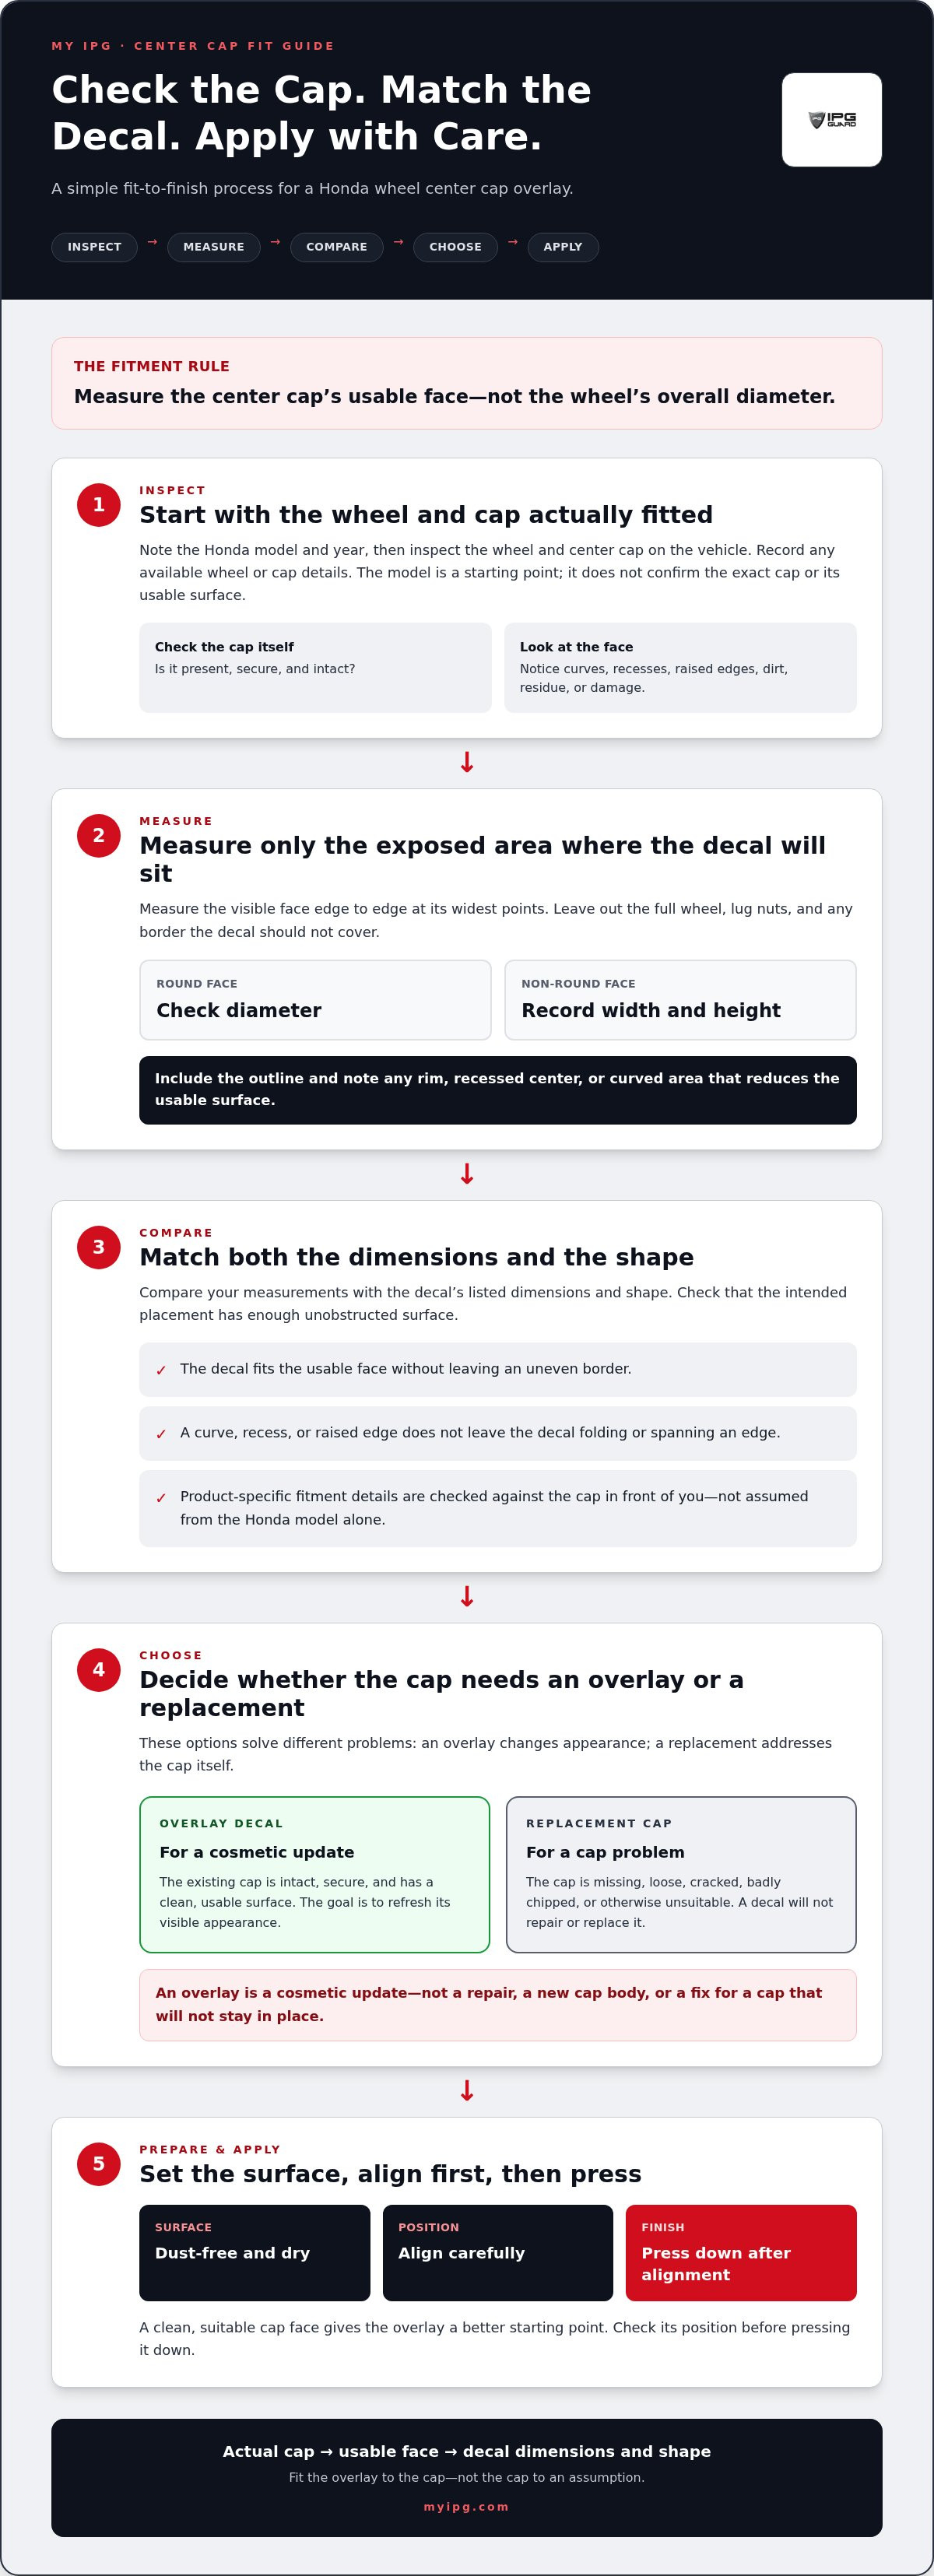
A decal sits cleanly only when its shape and dimensions suit the cap’s usable face. The wheel’s overall diameter is not a useful shortcut. Measure the exposed surface where the overlay will adhere, then use this checklist to compare it with the product details.
- Identify the wheel and center cap. Note your Honda’s model and year, then inspect the wheel and cap currently fitted. Record any available wheel or cap details. The model is a useful starting point, but it cannot replace measuring the actual part.
- Measure the usable face. Measure across the exposed area where the decal would sit, at its widest points. For a round face, check the diameter. For a non-round face, record both width and height. Exclude the full wheel, lug nuts, and any border the decal should not cover.
- Compare shape and dimensions with product details. Match your measurements to the stated decal dimensions and shape. Check whether a curve, recess, or raised edge leaves enough unobstructed surface for the decal to sit without folding or spanning an edge.
Fitment rule: Match the decal’s dimensions and shape to the center cap’s usable face, not to the wheel’s diameter.
Measure the center cap’s usable face
Use a ruler or measuring tape to measure the visible face from edge to edge at its widest point. If it is not circular, record its width, height, and outline. Note raised rims, recessed centers, and curved areas that reduce the flat surface. A decal that looks close in size may still overlap a lip or leave an uneven border, so compare your measurements with the product’s listed dimensions before ordering.
Match the decal to the specific wheel and cap
The Honda model alone may not identify the exact wheel or center cap fitted to your vehicle. Wheels and caps can vary, so use the cap in front of you and any available wheel or cap markings. Compare product-specific fitment information and dimensions with your measurements. A Honda design does not, by itself, mean a decal suits every Honda.
Surface shape matters as much as diameter. A curved face can make a flat overlay harder to place evenly. A raised rim or recessed area can reduce the surface available for adhesion. If the cap changes height across the intended placement, compare the decal’s shape and dimensions with the flat, usable area instead of trying to stretch it over an edge. This check helps prevent a visibly uneven result.
For a focused appearance refresh, compare your cap’s measurements with the details for My IPG Honda center cap overlay decals. Measure first, then choose based on the cap’s actual face and the look you want.
Honda Center Cap Decal vs. Replacement Cap: Which Makes Sense?
Choose according to what needs to change. An overlay updates the appearance of an existing cap that is suitable for application. A replacement cap addresses the cap itself when it is broken, missing, loose, or otherwise unsuitable. These options solve different problems, so a Honda wheel center cap decal is not a substitute for a replacement part.
| Option | Suitable situation | Key consideration |
|---|---|---|
| Overlay decal | The existing cap is intact, secure, and has a usable surface; you want a cosmetic change. | Match the decal’s shape and dimensions to the cap, and consider how its surface will affect placement. |
| Replacement cap | The cap is cracked, broken, missing, loose, or not suitable for an overlay. | The replacement needs to suit the wheel and fit as a cap, not just cover its face. |
Choose an overlay for a cosmetic refresh
An overlay makes sense when the existing cap is in sound condition and its face can support the decal. First decide what visible change you want. Then compare the overlay’s product details with the cap’s usable surface. My IPG offers IPG Decal Honda Center Cap Overlay Wheel Tire Decals for refreshing an existing cap’s appearance.
Inspect the cap before applying the overlay. A secure cap with a clean, even face provides a better foundation than one with peeling material, deep damage, or an uneven surface. Check whether the decal will sit within the face without crossing a raised edge or spanning a recess. If the surface is unsuitable, it may be difficult to achieve the finish you want.
Consider a replacement when the cap itself needs attention
A decal cannot restore a cracked or broken cap, replace a missing one, or correct a cap that will not stay in place. Covering damage does not repair the part beneath it. If the cap needs attention, treat that as a replacement-part decision first. Consider cosmetic customization after you have a suitable cap.
Keep the difference clear: a decal is an appearance layer applied to an existing part. A replacement cap takes the place of an unsuitable or absent cap. The right choice depends on the cap’s condition, not simply on which finish catches your eye.
Use this decision path: if the cap is present, secure, and suitable for application, compare overlays for the look you want. If it is damaged, missing, loose, or has a face that will not support a clean application, address the cap itself instead. A replacement needs to match the wheel and cap details. A cover that looks similar is not necessarily a fitting replacement. Separating repair needs from cosmetic goals helps you choose the right option for the job.
How to Apply and Care for a Honda Wheel Center Cap Decal
A neat application depends on preparation and placement, not speed. Read the product-specific directions before applying a Honda wheel center cap decal. Methods can differ, so do not assume that the same cleaner, tool, pressure, or waiting period is right for every decal.
Prepare the cap and plan placement
Work with a stable cap surface that is clean, dry, and free of dust or residue. Even a small particle under the decal can interfere with a smooth finish. Before removing the backing, check the intended position and orientation so you can place the decal accurately without having to reposition it after it touches the cap.
- Read the directions. Review the product’s application instructions, including surface preparation and aftercare. Follow those directions over general advice.
- Clean and dry the surface. Remove dirt and residue using a method supported by the product directions. Let the cap dry fully before application.
- Plan the alignment. Hold or dry-fit the decal as directed to check its position against the cap’s edges and any visible design. Center it before exposing the adhesive.
- Apply evenly. Place the decal carefully, then press it down evenly as instructed. Avoid stretching or shifting it during placement, which can leave the design off-center or create wrinkles.
- Follow aftercare instructions. Use any product-specific directions for settling, curing, or cleaning. Do not guess at a waiting time if the instructions do not provide one.
Application tip: Start with a clean, fully dry cap, then confirm alignment before pressing the decal into place.
Protect the finished decal during routine care
After application, keep routine cleaning gentle. Use a suitable method that will not scrape or catch the decal’s edges, and avoid picking at lifted areas. Follow the product’s care directions, since materials and adhesives can have different handling needs.
Look over the decal as you clean. If an edge appears lifted or the decal shifts, do not force it flat with a sharp tool or aggressive rubbing. That can mark the decal or cap. Refer to the product instructions for appropriate care. Do not assume a particular outdoor lifespan, heat tolerance, or resistance to cleaning chemicals unless those claims are stated for the specific product.
Small, careful steps help maintain the appearance you chose. Before starting, review the My IPG decal details and application guidance, then follow the instructions supplied for that product.
Choose the My IPG Honda Center Cap Overlay with Confidence
My IPG offers IPG Decal Honda Center Cap Overlay Wheel Tire Decals for a cosmetic refresh to an existing center cap. Start with the cap on your vehicle, not an assumption based on its Honda model. Check the cap’s condition, measure the exposed face, compare your measurements with the product details, and decide what appearance you want.
Review the product details against your cap
Use the product information to guide your comparison. Match any listed dimensions and shape to the usable face you measured, and review the finish, contents, and application directions provided. Fit depends on the specific cap and product details, so do not assume one overlay fits every Honda wheel. A close visual match is not a substitute for comparing measurements.
Use this final check before choosing:
- Cap condition: The cap is present, secure, and suitable for an appearance overlay.
- Usable face: You have identified the area available for the decal, including raised edges, curves, or recesses that could affect placement.
- Dimensions: Your measurements correspond with the product details. If the listed size does not match, do not rely on the vehicle badge alone.
- Intended appearance: The available design and finish suit the look you want for your wheels.
Take the next step toward a clean refresh
Careful selection makes application easier. Compare your cap’s surface and dimensions with the product information, then follow the decal’s instructions for preparation and placement. That check can help you spot a mismatch before applying the decal.
If the cap is damaged, missing, or unsuitable for an overlay, a decal will not resolve the problem. Choose an overlay for a cosmetic update to a suitable existing cap, and keep repair or replacement needs separate from styling decisions.
A Honda wheel center cap decal is a small detail, so the cap’s measurements and condition matter. Review the product details against your own wheel before choosing. If the overlay suits your cap and the appearance you want, explore My IPG’s Honda center cap decal range.
Make Your Next Wheel Detail Count
A polished finish starts with a choice that suits your vehicle, not a guess based on appearance alone. Select a design you will enjoy seeing on your Honda, and take the time to apply it carefully. A well-chosen Honda wheel center cap decal can create a more cohesive look at the wheel center while keeping the existing cap in place.
My IPG’s custom automotive vinyl decals include the Honda center cap overlay wheel tire decal for an appearance refresh. Review the product details alongside your cap and the style you want before choosing.
Explore My IPG’s Honda center cap decal and choose an overlay for your wheel refresh.
Frequently Asked Questions
Will a Honda wheel center cap decal fit every Honda model?
No. Honda models can have different wheels and center caps, and a previous owner may have changed the wheels. Check the cap currently installed rather than relying on the model name alone. Two vehicles of the same model can have different wheel designs. Compare the cap’s shape and usable face with the decal’s product details before choosing.
Can I put a Honda center cap decal over an existing emblem?
Possibly, if the decal is designed to cover the visible area and the emblem does not create an uneven surface. A raised badge, deep grooves, or peeling emblem material can prevent an overlay from sitting flat. Inspect the center face from different angles and consider whether the decal would bridge a raised section. Follow the product directions, since coverage and application depend on the decal.
How do I measure a wheel center cap for a decal?
Measure the exposed face where the decal will sit, not the wheel or the cap’s outer mounting section. For a round face, measure straight across its widest point. For an irregular face, record the widest width and height, and note any rim or recess that reduces the flat area. Use the same units shown in the product details when comparing measurements.
Are center cap decals the same as replacement center caps?
No. A decal overlays an existing cap to change its appearance. A replacement center cap is a separate part intended to take the place of a cap. If yours is missing, cracked through, or will not stay in position, an overlay cannot restore it. Decide whether you need a cosmetic update or a replacement part before selecting a decal.
How do I apply a wheel center cap decal without bubbles?
Start with a clean, dry surface and keep dust away while preparing it. Before removing the backing, check the decal’s orientation and position. Apply it gradually and evenly, following the product directions for pressure and placement. If a bubble appears, do not puncture or aggressively rub the decal unless the instructions recommend that method. Careful alignment helps avoid lifting and repositioning.
How should I clean wheels after applying a center cap decal?
Clean the wheel gently. Avoid directing forceful spray at the decal edges or scraping them with a hard tool. Use cleaning products and methods suitable for the decal, and follow its care instructions if provided. If dirt collects near an edge, wipe carefully rather than picking at it. Do not assume every cleaner or wheel-washing method is compatible with every decal.