
A single dust speck trapped under your glass isn't just an eyesore. It is a permanent scar on a high-value investment. When you are protecting a device like the Samsung Galaxy S26 or an iPhone, the margin for error is zero. Identifying the common screen protector installation mistakes to avoid is the first step toward a rugged, invisible shield. You want a factory-finish look. You need long-term adhesive stability that survives daily use without lifting at the corners or interfering with your phone case.
It's frustrating to watch a premium protector fail because of a misaligned edge or a stray lint fiber. We understand the stewardship you feel over your technology. This ultimate 2026 checklist provides the technical precision required for a bubble-free application. We will cover everything from creating a controlled environment to mastering the final seal on advanced Hydrogel films and tempered glass. You'll learn how to safeguard your device like a dedicated specialist. This ensures your screen remains the pristine, high-performance asset it was designed to be, with zero bubbles and perfect alignment every time.
Key Takeaways
- Protect your investment by understanding why precision matters for high-value displays like the BYD Seal.
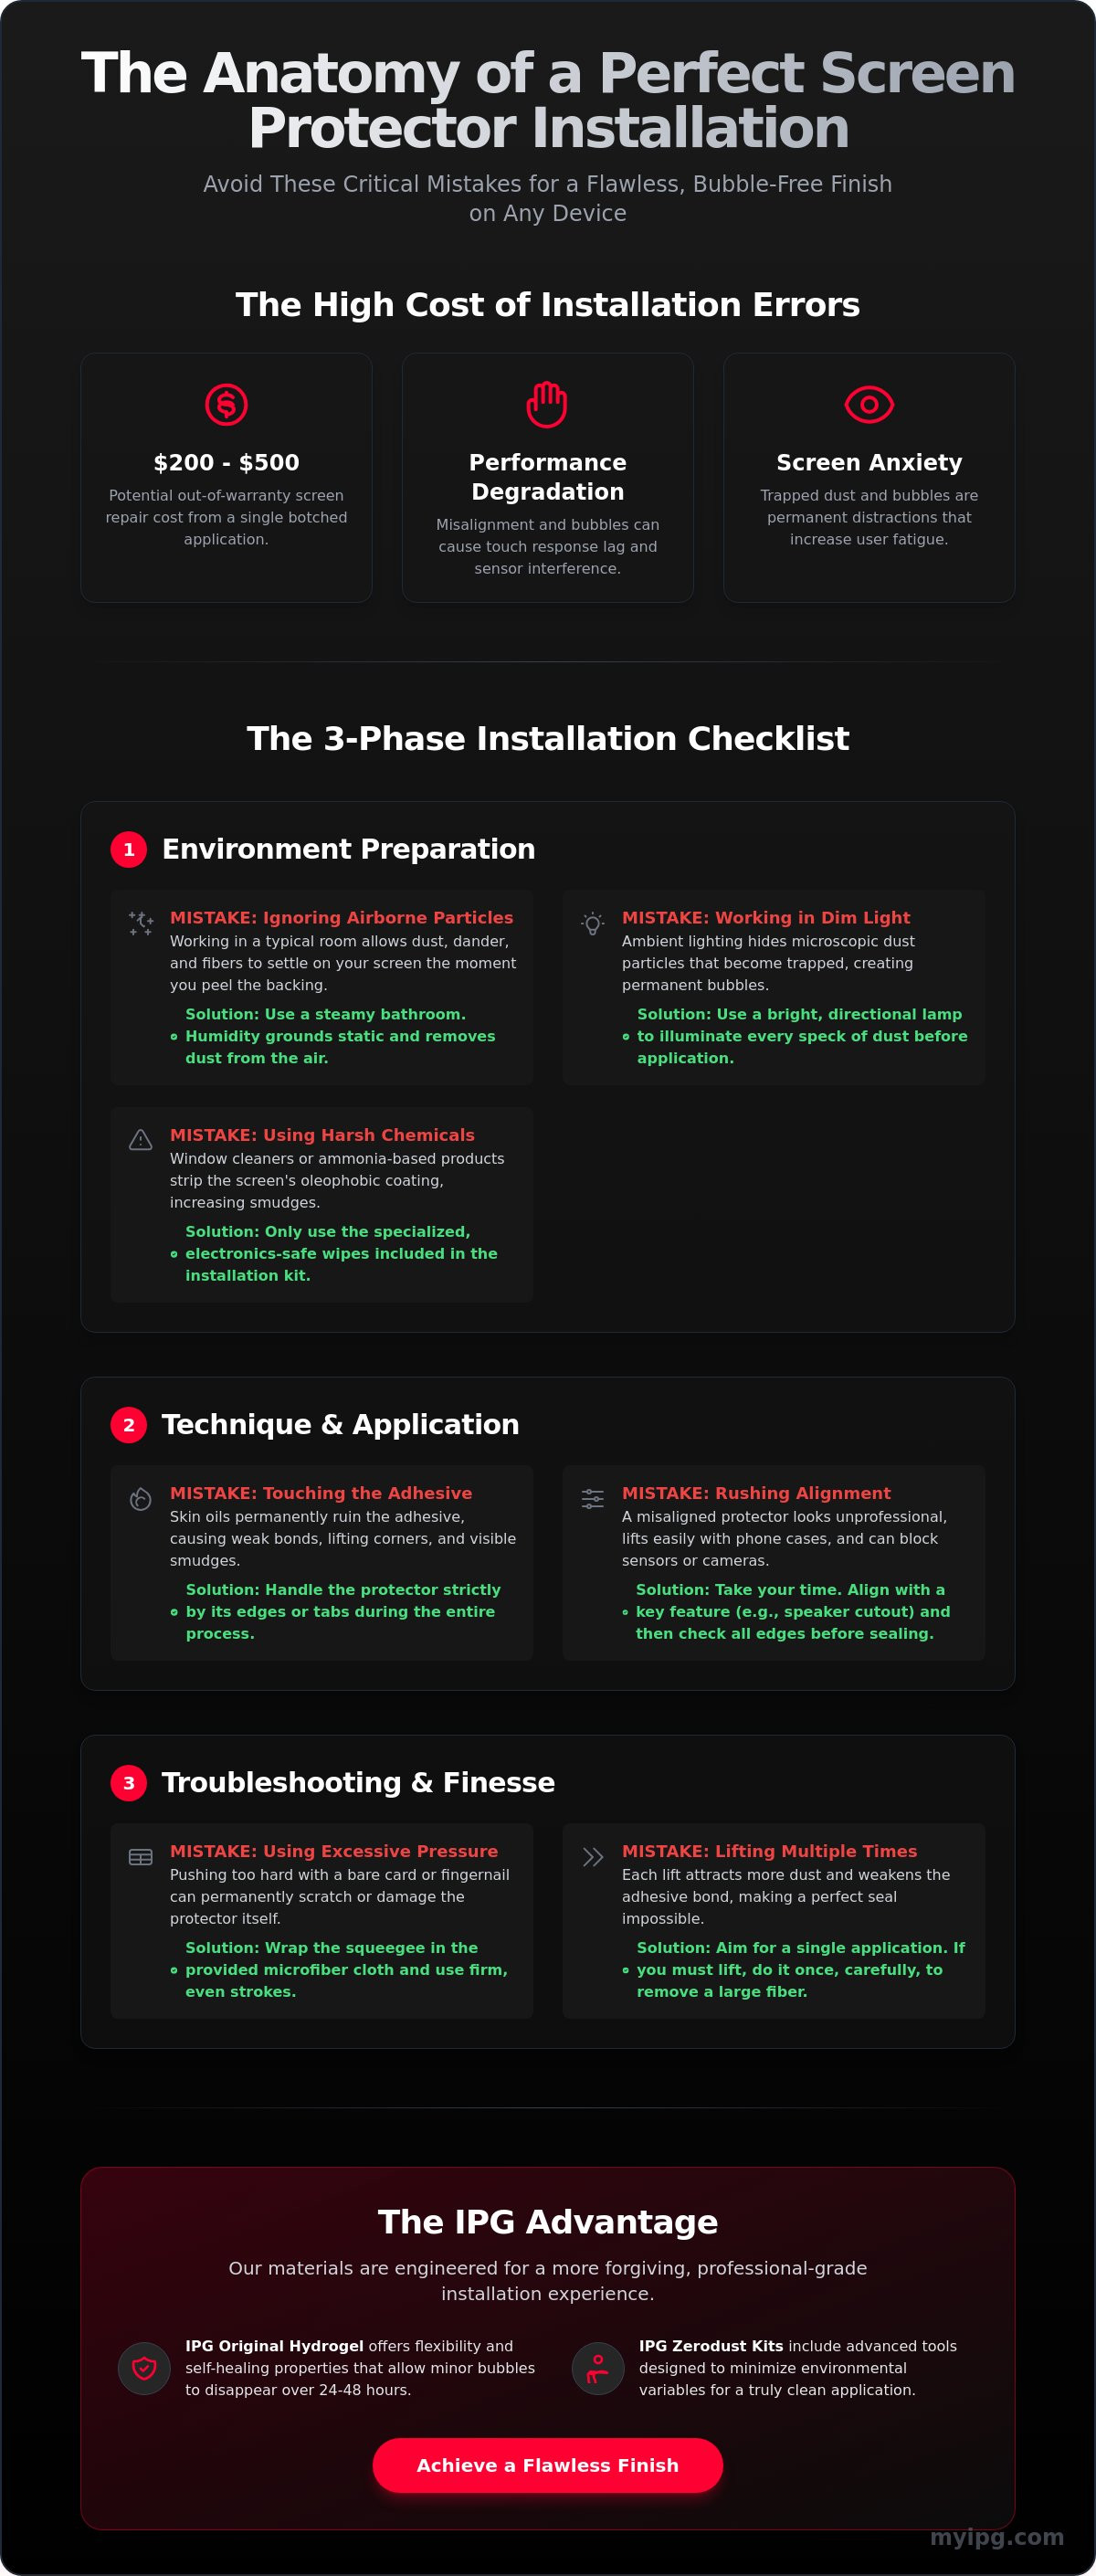
- Identify the critical screen protector installation mistakes to avoid, starting with environmental dust control and lighting optimization.
- Master the execution phase by preserving adhesive integrity and ensuring perfect alignment with technical sensor cutouts.
- Prevent surface damage by using correct pressure during bubble removal and avoiding the pitfalls of repeated lifting.
- Leverage the flexibility of IPG Original Hydrogel materials for a more forgiving, professional-grade installation experience.
The High Cost of Installation Errors: Why Precision Matters
Precision is the foundation of device longevity. A failed installation occurs the moment debris is trapped, edges are misaligned, or the adhesive bond is compromised. These aren't just minor annoyances. They represent a complete breakdown of the protective system. When you're dealing with premium tech, understanding the screen protector installation mistakes to avoid is essential for both financial and functional reasons. Ruining a specialized shield, such as the IPG ProActive for BYD 2022‑2025 SEAL Navigation Display Screen Protector (15.6" inch), means wasting a premium asset and leaving your high-value display vulnerable. With official out-of-warranty screen repair costs in 2026 ranging from $200 to $500, a botched application is an expensive gamble you don't need to take.
A poorly applied protector creates a barrier to performance. It can cause noticeable touch response lag, making your high-end smartphone feel sluggish. It can trigger sensor interference, causing your screen to stay dark during calls or fail to recognize your face. Effectively, your screen protector acts as a sacrificial protection layer. It's engineered to absorb impact and shatter, sacrificing itself to save the actual display. But this defense mechanism only works if the bond is chemically and physically perfect. Without a flush seal, the protector cannot distribute force correctly. It becomes a liability rather than an asset, potentially trapping moisture or grit against the very glass it's meant to guard.
The Psychology of the Perfect Shield
Visual clarity impacts your mental state. A screen filled with bubbles or dust specks creates "screen anxiety" and increases user fatigue during long sessions. Preserving that "out-of-the-box" feel is about more than aesthetics; it's about maintaining the emotional and financial value of your daily driver. Screen integrity is the balance between optical clarity and physical defense. When your shield is invisible, you can focus on the content rather than the hardware.
When to DIY vs. Seeking Professional Help
Not all screens are created equal. Flat industrial displays or standard smartwatches are often manageable for home installers. However, curved smartphone edges or large automotive panels require extreme precision. Some tasks, like applying an IPG Phone camera lens protector, are high-precision operations where even a microscopic fiber can ruin the clarity of your photos. Recognizing when a protector is beyond saving is crucial for your sanity. If the adhesive is contaminated with skin oils or heavy household dust, the protector is likely ruined. Attempting to force a contaminated shield onto your device is one of the biggest screen protector installation mistakes to avoid. It risks permanent micro-abrasions on your screen's oleophobic coating.
The Preparation Phase: Avoiding Environmental Pitfalls
Preparation is the invisible work that determines your final result. Most screen protector installation mistakes to avoid happen before the protector even touches the device. Success starts with engineering your environment. Your living room isn't a sterile lab. Household air is thick with skin cells, pet dander, and fabric fibers. Mistake #1 is ignoring these airborne invaders. They wait for the exact moment you peel the backing to settle on your screen. Mistake #2 is working in dim, ambient light. You can't fix what you can't see. Use a bright, directional desk lamp to reveal microscopic debris before it becomes a permanent bubble. Mistake #3 involves harsh chemicals. Never use window cleaners or products containing ammonia. These strip the factory-applied oleophobic coating from your glass, making future smudges harder to clean. Use only the specialized, electronics-safe wipes provided in your installation kit.
While research into advanced screen protection technology explores non-Newtonian fluids for impact resistance, the current standard remains high-clarity films and tempered glass. These materials require a pristine surface to bond effectively. For those seeking the highest level of environmental control, the IPG Zerodust Screen Protector series includes tools designed to minimize these variables during the application process.
Controlling Static and Airborne Particles
Humidity is your best ally against dust. Run a hot shower for five minutes to create a "steamy bathroom" effect. The moisture in the air grounds static electricity and forces airborne particles to the floor. This creates a temporary clean-room environment. Never wear wool or high-fiber clothing like fleece during installation. These materials are magnets for static and shedders of lint. When removing stray dust, use specialized dust-removal stickers. Don't use standard office tape. It often leaves a gummy residue that is nearly impossible to remove without starting the entire cleaning process over.
The Three-Stage Cleaning Protocol
Cleanliness is a process, not a single wipe. Follow this three-stage protocol for a professional finish:
- Stage 1: De-greasing. Use an alcohol-based wipe to dissolve skin oils and fingerprints. Focus on the edges where oils tend to accumulate.
- Stage 2: Microfiber Buffing. Use a clean, dry microfiber cloth to remove streaks and remaining moisture. Move in one direction to avoid swirling debris.
- Stage 3: The Final Dust-Lift. This is the most critical step. Perform this immediately before laying the film. Use your dust-removal sticker to "dab" the entire surface, ensuring not a single speck remains.
By mastering these environmental factors, you eliminate the primary causes of failed applications. Taking ten minutes to prepare your workspace saves you the frustration of a ruined protector and the cost of a replacement.
Execution Errors: Technique vs. Luck in Application
Execution is where theory meets reality. Even with a pristine environment, the physical application requires a steady hand and a methodical approach. One of the most frequent screen protector installation mistakes to avoid is touching the adhesive side with bare fingers. Your skin naturally carries oils that permanently compromise the chemical bond. Once a fingerprint is on the adhesive, it's there forever. It creates a visible "halo" that no amount of pressure can fix. Mistake #5 involves misaligning the cutouts. Modern devices rely on precision sensors. Blocking the FaceID array or a proximity sensor with a fraction of a millimeter of overlap can render your device's most advanced features useless.
While many resources offer a step-by-step guide to applying a screen protector, they often overlook the complexity of large-scale surfaces. Applying an IPG ProActive shield to a 15.6-inch BYD Seal display or a protector to a Snap-on Triton diagnostic tool isn't like doing a phone. The surface area increases the risk of Mistake #6: peeling the entire backing off at once. For large screens, a staged release is mandatory. Peel only the first two inches, align, and then gradually remove the backing while following with a squeegee. This maintains tension. It prevents the film from flopping and trapping massive air pockets or stray fibers mid-way through the process.
The Art of Alignment
Alignment is a game of millimeters. Most people skip the dry-fit, but it's the most important step. Place the protector on the screen with the backing still on. Check the clearance for cameras and speakers. Use the "Hinge Method" by applying two pieces of tape to one side of the device, creating a door-like mechanism. This ensures 90-degree alignment every time you "close" the protector onto the glass. It's especially vital for the IPG Snap-on Triton Apollo Solus +screen protector, where industrial-grade precision is required for touch accuracy in a workshop environment.
Managing the Adhesive Bond
The moment of contact is final. Remember the mantra: "slow is smooth." Lower the protector gradually from the center or one edge. Use a "center-out" pressure technique. Start at the middle and push air toward the nearest edge. This prevents air from being trapped in a "dead zone" where it cannot escape. Adhesive is a chemical bond that requires time to cure fully. It's a living material that settles over 24 to 48 hours. Don't stress over microscopic "fogging" immediately after install; these often disappear as the bond matures. However, large bubbles caused by debris are permanent. Avoid the temptation to lift and reposition multiple times, as this only introduces more contaminants.
Troubleshooting Post-Install Blunders and Bubbles
The moment the protector meets the glass is often filled with anxiety. You might see a stray bubble and feel the urge to panic. This is where most screen protector installation mistakes to avoid occur. Mistake #7 is aggressive squeegeeing. Using a bare plastic card, like a credit card, is a recipe for disaster. These rigid edges can scratch or gouge the surface of a new shield, especially hydrogel varieties. Mistake #8 is the "lift and re-stick" cycle. Every time you peel the protector back, you expose the adhesive to more airborne contaminants. It's a diminishing return. Mistake #9 is impatience. Many users don't allow for the 24 to 48 hour settle period. Small, hazy micro-bubbles often disappear as the adhesive cures. Give the material time to breathe before declaring the install a failure.
Identifying the type of bubble is critical. An air bubble is clear and usually moves when pressed. A dust bubble has a visible speck at its center. Air can be pushed out. Dust cannot. If you find yourself struggling with persistent debris, consider switching to a more advanced solution. You can achieve a professional finish by using the IPG Zerodust Screen Protector, which is engineered to simplify the dust-management process.
The Squeegee Strategy
Your tool choice matters. A felt-tipped squeegee provides a soft contact point that prevents surface marring. Hold the tool at a 45-degree angle. Move from the center toward the edges in a single, smooth stroke. This technique extracts trapped air without stretching the film. For products like the IPG Original (Hydrogel) Screen Protector, the material has self-healing properties. Minor pressure marks from the squeegee will often vanish within a few hours. Don't overwork the surface. Let the material's chemistry do the job for you.
Saving a Ruined Install
If you spot a dust speck mid-install, you can attempt a "surgical lift." Use a small sticker to gently pull up the corner closest to the debris. Do not use your fingernail. Fingernails leave permanent kinks in the material. Once lifted, use a second sticker to dab the speck off the adhesive side of the protector. Carefully lay the protector back down. This is a one-time fix. If the protector starts to lift at the edges later, check for case interference. Some rugged cases press against the protector, forcing it up. You can safely clean the edges with a dry microfiber cloth, but avoid getting moisture under the adhesive. If a micro-bubble is smaller than a pinhead and clear, leave it alone. The adhesive will likely absorb it during the curing phase.
The IPG Advantage: Precision Protection for Every Device
Choosing the right material is your final defense against screen protector installation mistakes to avoid. While rigid tempered glass is popular, it lacks the adaptability required for many modern, high-curvature displays. The IPG Original (Hydrogel) film is a specialized solution designed for the real world. It offers a forgiving application process that rigid glass cannot match. If you encounter a slight misalignment, the material’s inherent elasticity allows for minor adjustments without compromising the adhesive bond. This "Zero-Dust" philosophy focuses on high-performance materials that simplify the installation experience for the consumer while maintaining professional-grade protection.
Precision is not a luxury; it is a technical requirement. We engineer our shields to match the exact specifications of high-value assets. This includes niche gear like the IPG Garmin DESCENT Screen Protector and the IPG Camera Lens Protector for Harley Cluster Display. These devices operate in extreme environments where a failed installation isn't just an eyesore, it’s a functional failure. Our technical authority ensures every cutout is accurate to the micron, preserving the integrity of your sensors and displays.
Before you consider the job finished, perform a five-minute post-install inspection. This methodical audit ensures long-term stability:
- Perimeter Seal Check: Run a microfiber cloth along the edges to ensure the adhesive has fully bonded without lifting.
- Sensor Transparency Test: Verify that FaceID, proximity sensors, and cameras are completely unobstructed.
- Tactile Response Verification: Test touch sensitivity across the entire surface, especially near the corners.
- Optical Clarity Audit: Inspect the display under a bright light to distinguish between micro-bubbles and trapped debris.
- Case Clearance Confirmation: Ensure your protective case isn't exerting pressure on the edges of the new shield.
Specialized Shields for Specialized Gear
Protection extends beyond the smartphone. We provide critical defense for industrial and marine electronics. Assets like the IPG Snap-on Triton Apollo Solus +screen protector or the IPG screen protector Autel MaxiIM KM100 require high-durability materials that resist workshop oils and abrasions. For marine environments, the IPG Lowrance Eagle 4" Elite hds poroFishFinder screen protector offers high-transparency shields that remain legible under direct sunlight and salt spray. We even bridge the gap between protection and aesthetics with items like the IPG Tesla Model 3 / Model Y door handle decal, ensuring every surface of your vehicle remains pristine.
The Guardian Promise
IPG ProActive technology is built to evolve. As manufacturers move toward next-gen OLED and Micro-LED displays, our materials adapt to preserve color accuracy and light filtration. We view ourselves as guardians of your technology. Our specialized register of material properties ensures that your high-value items are handled with technical care and professional confidence. Don't settle for a generic fit when you can have precision engineering. Explore the full range of IPG precision shields and secure your investment today.
Master the Art of Invisible Defense
Achieving a factory-finish installation requires more than just luck. It demands environmental control and a methodical approach to alignment. By identifying the critical screen protector installation mistakes to avoid, you transition from a frustrated consumer to a precision specialist. Remember that 90% of your success happens before the film even touches the glass. Engineering your workspace and mastering the "slow is smooth" application technique ensures your high-value displays remain pristine.
We've spent years refining the science of device preservation. Our precision-cut shields are tailored for over 5,000 unique devices, providing a seamless fit that generic brands can't match. It's the reason Tesla and BMW owners worldwide trust our stewardship over their high-performance screens. Don't leave your investment to chance when you can utilize advanced Hydrogel self-healing technology for long-term stability.
Secure your tech with IPG precision-cut protectors and enjoy the confidence of total screen security. Your devices are now ready for the real world. Take pride in your perfect, bubble-free finish.
Frequently Asked Questions
How do I get air bubbles out of my screen protector after it is already on?
Push air bubbles toward the nearest edge using a felt-tipped squeegee or a microfiber cloth wrapped around a credit card. Apply firm, consistent pressure to move the air pocket across the display. If the bubble is small and clear, wait 24 to 48 hours. Most modern adhesives are designed to absorb microscopic air pockets during the curing phase. If the bubble does not move, it likely contains a dust speck.
Can I wash and reuse a screen protector if I messed up the installation?
Most premium protectors are not designed for washing and reuse. While some hydrogel films can be rinsed with distilled water, this process often introduces more contaminants than it removes. Washing typically degrades the adhesive's chemical integrity and risks scratching the material. It's usually more effective to start with a fresh unit to ensure your device's oleophobic coating remains protected and the bond stays secure.
Why does my screen protector keep lifting at the edges?
Lifting is usually caused by case interference or residual skin oils on the glass. If your protective case is too rugged, it might press against the perimeter of the protector, forcing it upward. Ensure you thoroughly degreased the edges with an alcohol wipe during the preparation phase. Even a microscopic amount of oil can compromise the adhesive bond, leading to permanent lifting and debris accumulation at the corners.
Is the "steamy bathroom" trick actually safe for my electronic devices?
Yes, the steamy bathroom method is safe if you avoid excessive moisture and direct water contact. The humidity grounds static electricity and forces airborne particles to the floor, creating a temporary clean-room environment. This is a highly effective way to minimize the screen protector installation mistakes to avoid, as it drastically reduces the chance of a stray dust speck ruining your application mid-way through the process.
What is the difference between a dust bubble and an air bubble?
A dust bubble has a visible speck of debris at its center, while an air bubble is completely transparent. You can easily push an air bubble to the edge for extraction. A dust bubble is a permanent failure because the debris prevents the adhesive from making contact with the glass. Identifying this early is key. If it's dust, you'll need a surgical lift with a sticker to remove the speck.
How long should I wait before putting my case back on after installing a protector?
Wait at least 24 hours before re-installing your device's case. This window allows the adhesive to reach its full bonding strength and finish curing. Putting a case on too early can catch the edges of the protector, which are still settling, and cause them to peel back. For hydrogel materials, this time is also critical for the film to absorb any microscopic "haze" or tiny air pockets.
Will a screen protector interfere with my ultrasonic fingerprint scanner?
High-quality shields, such as an IPG Samsung screen protector, are specifically engineered for ultrasonic sensor compatibility. These protectors maintain the technical specifications required for signal transparency. To ensure peak performance, you should always re-register your fingerprints after the installation is complete. This allows the scanner to calibrate to the new layer, ensuring your biometric security remains fast and reliable without any touch response lag.
How do I install a screen protector on a large car navigation screen without it being crooked?
Use the "Hinge Method" and a staged release for large automotive displays. Align the protector with the backing still on and secure one side with two pieces of heavy-duty tape to create a door-like hinge. Peel only the first few inches of the backing, then gradually lower the protector while following closely with a squeegee. This maintains constant tension, preventing the film from sagging or shifting during the application process.