

What if the haze in your flash photos isn’t a camera fault, but a reflection bouncing between the lens and its protector? If you’re asking, “does a lens protector cause camera flash glare,” the answer is sometimes. A poorly aligned, smudged, scratched, or flash-obstructing protector can contribute to halos, streaks, or washed-out shots. But glare isn’t an inevitable trade-off for protecting your phone’s camera.
Cloudy photos can be frustrating, especially when the cause isn’t obvious. Removing protection may feel risky when your phone’s camera lenses are exposed. Before making a change, compare a few consistent shots and inspect the camera area for smudges, damage, or anything covering an opening. These simple checks can help narrow down the cause.
This guide explains how a protector may affect light, how to test whether it’s contributing to glare, and what to consider when choosing a replacement. You’ll also learn why dirt, damage, and other light sources can create similar effects, so you can protect your camera without overlooking image quality.
Key Takeaways
- Does a lens protector cause camera flash glare? It can contribute, but consistent comparisons can help distinguish protector-related reflections from other causes.
- Reflections between surfaces may appear as haze, streaks, ghosting, or reduced contrast around bright light.
- Compare keeping, cleaning, reseating, or briefly removing a protector to weigh image quality against camera protection.
- Use your test results to choose a practical next step, such as checking alignment or considering a suitable replacement.
Does a lens protector cause camera flash glare? The short answer
Yes, a lens protector can contribute to camera flash glare, but it isn’t the only possible cause. Fingerprints, dust, scratches, residue on the camera lens, and reflections from nearby surfaces can also affect a flash photo. The result depends on the protector’s design and alignment, the phone’s camera layout, cleanliness, and the scene being photographed.
Flash glare is an unwanted effect around bright light. It may appear as a streak, a soft halo, ghosting, washed-out highlights, or an overall loss of contrast and clarity. These patterns can look similar, so one hazy image doesn’t prove that the protector is responsible.
A controlled comparison is more useful than guessing from one photo. Keep the scene and camera settings consistent, then compare images after cleaning the camera area or, if safe, temporarily removing the protector.
What does flash glare look like in a phone photo?
A light streak may extend from a bright point, while a soft halo forms a glow around it. Washed highlights lose detail near the flash-lit subject; general haze makes more of the frame look veiled or low in contrast. The appearance can shift with the scene, flash direction, and nearby reflective surfaces such as glass or polished metal. Treat these as clues, not a diagnosis. Compare photos before deciding what caused the effect.
Can a lens protector affect the phone flash?
It can. Light may reflect between surfaces in a camera system, creating flare or ghosting. A protector adds another surface, and residue, dust, or a misaligned edge may also affect the light reaching the camera. The result varies because protector designs and phone camera layouts differ. The underlying effect is related to lens flare, which involves unwanted light reflections and scattering in an optical system.
Check that the protector sits clear of the flash and camera openings, then look for smears or visible damage. For more on balancing camera protection with image clarity, see the phone camera lens protector guide. My IPG offers phone camera lens protectors, and a careful comparison can help you decide whether the protector on your device is contributing to glare.
How light reflections can create glare around a phone camera flash
Light doesn’t always travel straight through a camera system. Some can bounce between optical surfaces before reaching the sensor, creating a faint duplicate of a bright source, a veil of haze, or a loss of contrast. An added protector surface may become part of that path, but it isn’t automatically the cause. Reflections can also come from the phone’s own camera components or objects in the scene.
An extra optical surface can redirect a small amount of light toward the camera sensor, where it may appear as haze or ghosting instead of detail. Whether that happens, and how noticeable it is, depends on the protector’s position, the camera’s design, and the light entering the scene. That’s why the question “does a lens protector cause camera flash glare” can’t be answered from appearance alone.
Why bright light can reveal reflections and haze
A phone flash illuminating a dark background creates strong contrast: a small, bright area sits beside deep shadows. Stray light can stand out against those shadows, making a faint halo, streak, or ghost image easier to see. The same effect can appear around a streetlight at night or a bright lamp in a dim room, even without flash.
Nearby reflective objects add another variable. A window, glossy table, or polished surface may send light back toward the camera or into the lens area. If an artifact changes when you move the phone or alter the scene, that’s useful evidence, but it doesn’t identify a single cause by itself.
How dirt, alignment, and camera design can mimic protector glare
Before blaming the protector, inspect the camera area for fingerprints, dust, adhesive residue, or debris near an opening. A thin smear can scatter light, while a scratch or trapped particle may create a localized flare. Clean gently with a suitable soft lens cloth. Avoid scraping at residue or pressing hard on the camera.
Fit matters, too. A protector that isn’t seated evenly, or an edge that sits close to an opening, may affect how light reaches the camera. Camera-module layouts vary between phones, so the same protector shape or placement won’t necessarily behave identically on every device.
Consider the type of image problem as well. Flash glare tends to appear near bright light as veiling haze, halos, or streaks. Focus trouble makes details look soft; motion blur creates directional smearing; low-light noise appears as grain or speckling across darker areas. These clues can help narrow the possibilities, but comparison photos are still needed before drawing a conclusion.
For camera protection as part of caring for your device, explore the phone camera lens protector options.
Compare lens protector options without assuming one is glare-proof
If your test suggests the protector may be affecting photos, choose your next step based on what changed. Cleaning can help identify surface residue; a brief removal comparison can help isolate the protector. Neither result means every protector will behave the same way. The question “does a lens protector cause camera flash glare” is best answered by testing your phone’s setup, then weighing image quality against the protection you want to keep.
Keep, clean, remove, or replace: what each choice can tell you
| Option | Impact on protection | Diagnostic value | Practical trade-off |
|---|---|---|---|
| Keep the current protector | Protection stays in place. | Offers a baseline for comparison. | Useful if glare is occasional or hasn’t been clearly linked to the protector. |
| Clean and check its fit | Protection remains in place. | Can reveal whether smudges, dust, or visible misalignment contribute. | Use a soft, suitable cloth; avoid pushing debris toward openings. |
| Remove it briefly for a test | The camera area is exposed during the test. | A consistent before-and-after comparison can help isolate the protector as a factor. | Handle the phone carefully, keep the test brief, and reinstall protection or replace it afterward if desired. |
| Replace it | A new protector can restore a protective layer. | Comparison may show whether the original protector’s condition or fit mattered. | Choose a compatible design and check its fit on your phone. |
Clean first, then retake the same kind of photo before changing anything else. If glare remains, a temporary removal test may add useful evidence. Don’t treat one improved shot as proof. Keep the scene, framing, flash setting, and lighting consistent, and repeat the comparison where practical.
What to compare when choosing another camera protector
Start with a precise fit around the camera openings and clear, device-specific compatibility information. A protector should sit as intended without visibly covering an opening. Material labels alone don’t establish real-world flash performance. Review specific details about materials and optical performance when available, but don’t assume a coating or glare-reducing feature unless it’s documented.
Assess the replacement on your own phone under the flash conditions that matter to you, such as indoor portraits or dim-room snapshots. For broader considerations when balancing display protection and usability, read the screen protector buying guide. To explore phone camera protection, view the phone camera lens protector options.
How to test whether your lens protector is causing flash glare
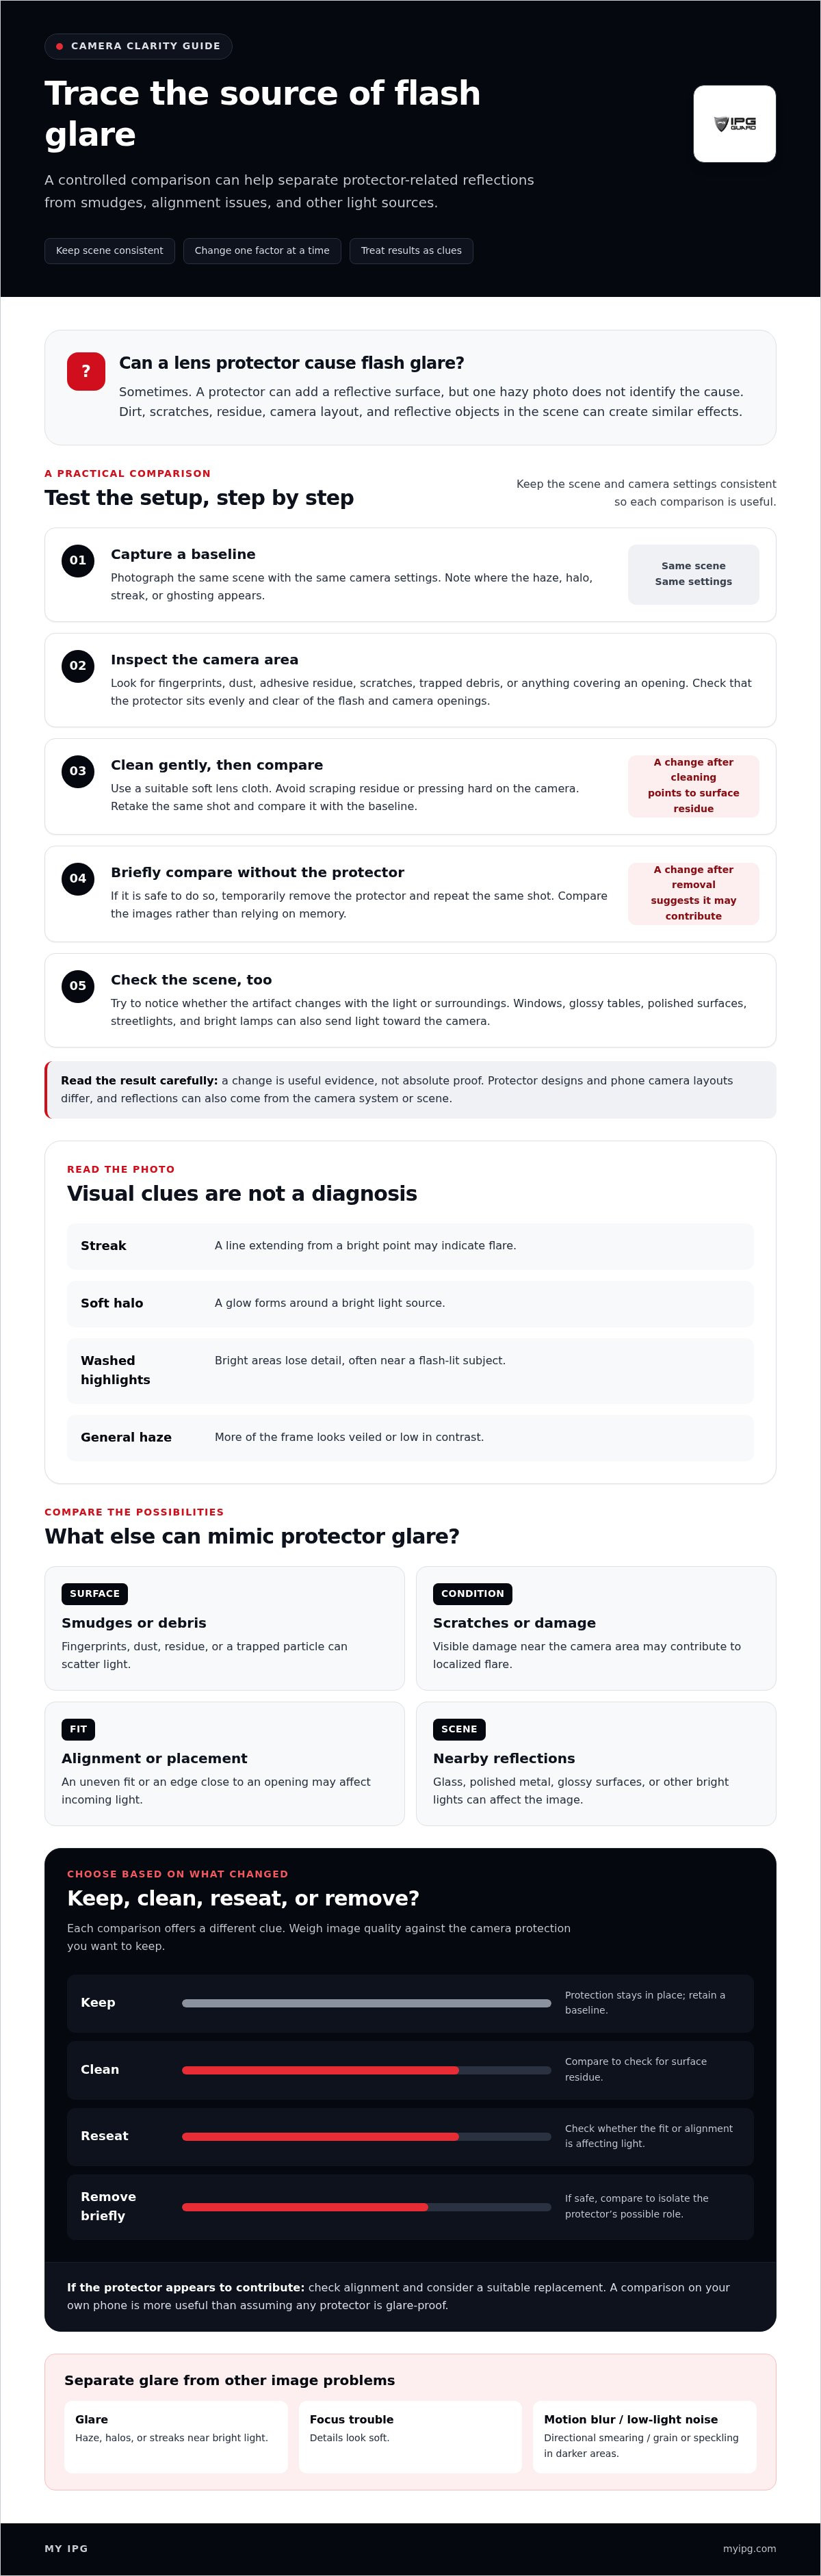
A useful test changes one thing at a time. Compare the same phone setup with the protector in place and, only if it can be removed safely, without it. Keep the lens protected from contact during the brief comparison. If the protector seems fixed or difficult to remove, don’t pry it off.
A controlled before-and-after flash test
Follow these steps to make the comparison more meaningful:
- Choose a repeatable scene. Use a stationary subject and the lighting where glare usually appears. Keep reflective objects and other light sources in the same positions.
- Clean gently. Use a clean, soft lens cloth on the protector and around the camera openings. Don’t scrape, press hard, or use a rough material.
- Take the first set. Use the same camera lens, flash setting, framing, distance, and lighting you’ll use for the second set. Capture several frames without moving the phone or subject.
- Remove the protector only if safe. Follow its removal instructions; don’t force or pry it. Keep fingers and tools away from the exposed camera lens. If removal isn’t straightforward, stop and compare after cleaning and checking alignment instead.
- Repeat the shots. Keep the same scene, settings, distance, and framing. Compare the same areas of each image for haze, streaks, ghosting, and contrast.
A repeatable before-and-after comparison is stronger evidence than a single flash photo. Multiple frames help reduce the influence of accidental movement or small exposure changes.
How to interpret the result and protect the camera
If the same glare pattern becomes noticeably less prominent across repeated photos without the protector, it may be contributing. That doesn’t prove it’s the only cause, but it gives you a useful basis for cleaning, checking the fit, or comparing a replacement.
If the artifact remains, look at other factors. Clean the camera area, check for reflective objects near the scene, and notice whether changing the phone’s angle changes the effect. Persistent blur or image problems beyond the flash area may have a different cause. Don’t touch or scratch the exposed lens during testing, and restore protection promptly if you choose to keep using a protector.
For protection designed for your phone’s camera area, explore phone camera lens protectors.
What to do if a lens protector appears to cause flash glare
Let the comparison guide your next step. A protector that may contribute to glare doesn’t automatically need to come off for good. First check for residue or uneven placement. If glare persists across controlled shots and changes consistently when the protector is removed, consider a replacement that fits your phone’s camera module and provides the protection you want.
When cleaning or repositioning may be enough
Follow your device and protector care instructions. Gently clean the surface with a clean, soft material suited to camera lenses. Avoid abrasive cloths, scraping, or pressing hard. Then inspect whether the protector sits evenly around each camera opening and whether anything appears to obstruct an opening. If it needs repositioning, follow its installation guidance rather than forcing it into place. Retake comparison photos under the same conditions to see whether the artifact changes.
When to consider a different protector
If a repeatable test links the current protector with the unwanted effect, replacing it may be a reasonable next step. Compare precise fit and device-specific compatibility information, along with any available details about materials and optical performance. Material names alone don’t establish how a protector will perform with your phone’s flash, and broad “glare-free” claims aren’t a substitute for clear product information or your own comparison.
Keep the camera protected while you decide. If glare remains after cleaning or replacing the protector, look again at lighting, nearby reflective surfaces, and the camera area itself rather than assuming the protector is the only cause.
For another option to consider alongside clear camera images and everyday protection, explore My IPG camera lens protection.
Protect your camera while keeping photos clear
So, does a lens protector cause camera flash glare? It can contribute, but glare may also come from dirt, nearby reflective surfaces, or other camera and lighting factors. A single hazy photo isn’t enough to identify the source.
Start with a gentle clean and check that the protector sits evenly around the camera opening. If you still suspect it, compare repeatable photos with and without the protector, but only if removal is safe. Use what you observe to choose a measured next step, whether that’s keeping your current protection, adjusting it, or comparing a compatible replacement. Fit and clear product information matter; material labels alone can’t guarantee how a protector will perform in your flash photos.
My IPG offers phone camera lens protectors for people considering camera protection. Explore My IPG camera lens protection and choose a protector for your device. With a careful test and a considered fit, you can protect your camera while keeping image quality in view.
Frequently Asked Questions
Can a lens protector cause camera flash glare?
Yes, a lens protector can contribute to flash glare if light reflects between surfaces or the protector is dirty, scratched, misaligned, or obstructs a camera opening. But glare can also come from residue on the camera, nearby reflective objects, or the scene’s lighting. A clean, correctly fitted protector won’t necessarily cause a visible problem. Compare consistent photos before deciding it’s the source.
Why do my flash photos look hazy with a camera lens protector?
Haze can appear when flash light scatters or reflects before reaching the camera sensor. A fingerprint, dust, residue, or a damaged surface may contribute, as can reflections from nearby glass or polished objects. Dark backgrounds can make stray light easier to notice. Check the protector and camera area gently, then compare photos under the same conditions to see whether the haze changes.
How can I tell if my lens protector is causing flash glare?
Use a controlled comparison rather than relying on one photo. Clean the camera area gently, then photograph the same stationary subject with the same camera lens, framing, distance, flash setting, and lighting. Take several shots. If it’s safe to remove the protector, repeat the comparison without it and check whether the same haze, streak, or ghosting changes consistently. Don’t pry off a protector that resists removal.
Does removing a camera lens protector improve flash photos?
It may improve them if the protector is contributing to the glare, but removal won’t solve artifacts caused by dirt on the camera, scene reflections, or other factors. A brief, careful comparison can help isolate the protector’s role, provided it can be removed safely. Keep the exposed camera lens away from fingers, tools, and surfaces, and restore protection or consider a suitable replacement after testing.
Can a dirty lens protector make flash pictures look blurry or cloudy?
Yes. Fingerprints, dust, or residue on a protector can scatter light and make flash photos look cloudy, hazy, or less defined. Scratches or debris around the camera opening may also affect image clarity. Gently clean the surface with a clean, soft material suited to the device, following its care guidance. If the image remains blurry, compare focus and camera behavior rather than assuming the protector is responsible.
Should I replace my lens protector if flash glare continues?
Consider replacing it if repeated, consistent comparisons suggest the current protector contributes to the glare, especially if it’s scratched, damaged, or poorly aligned. Before choosing another, review its fit and device compatibility information, along with any available material or optical-performance details. Don’t rely on material labels or broad glare-free claims alone. If the artifact remains after a change, check other possible causes before removing protection permanently.