

A camera lens scratch can cost you twice: in image quality and resale value. A visible scratch can affect a phone’s resale value, and repair costs vary depending on the device and the damage. The best way to learn how to stop phone camera lens scratch repair costs from rising is to understand whether the mark is superficial or affecting your photos.
A quick household fix can be tempting, especially when the scratch looks minor. But abrasive polishing and liquids can cause further damage, so treat DIY methods with caution.
This guide explains which DIY options may help, how scratch depth and image changes shape the repair decision, and when replacement is the safer choice. You’ll also learn how a compatible camera lens protector or a protective case can help guard against further damage, keeping your phone’s camera ready for the moments you want to capture.
Key Takeaways
- Assess whether a mark is affecting your photos before attempting a fix; the scratch’s depth can change the best next step.
- Household polishing methods may make a scratch less noticeable, but they can’t reliably restore damaged lens glass.
- DIY lens replacement involves opening the phone, which can disturb its seals and affect water resistance.
- A protective case and a compatible camera lens protector can help shield the camera from contact with objects.
- Warranty and insurance coverage depends on their terms, so understand the coverage before choosing how to handle the damage.
DIY methods for phone camera lens scratches
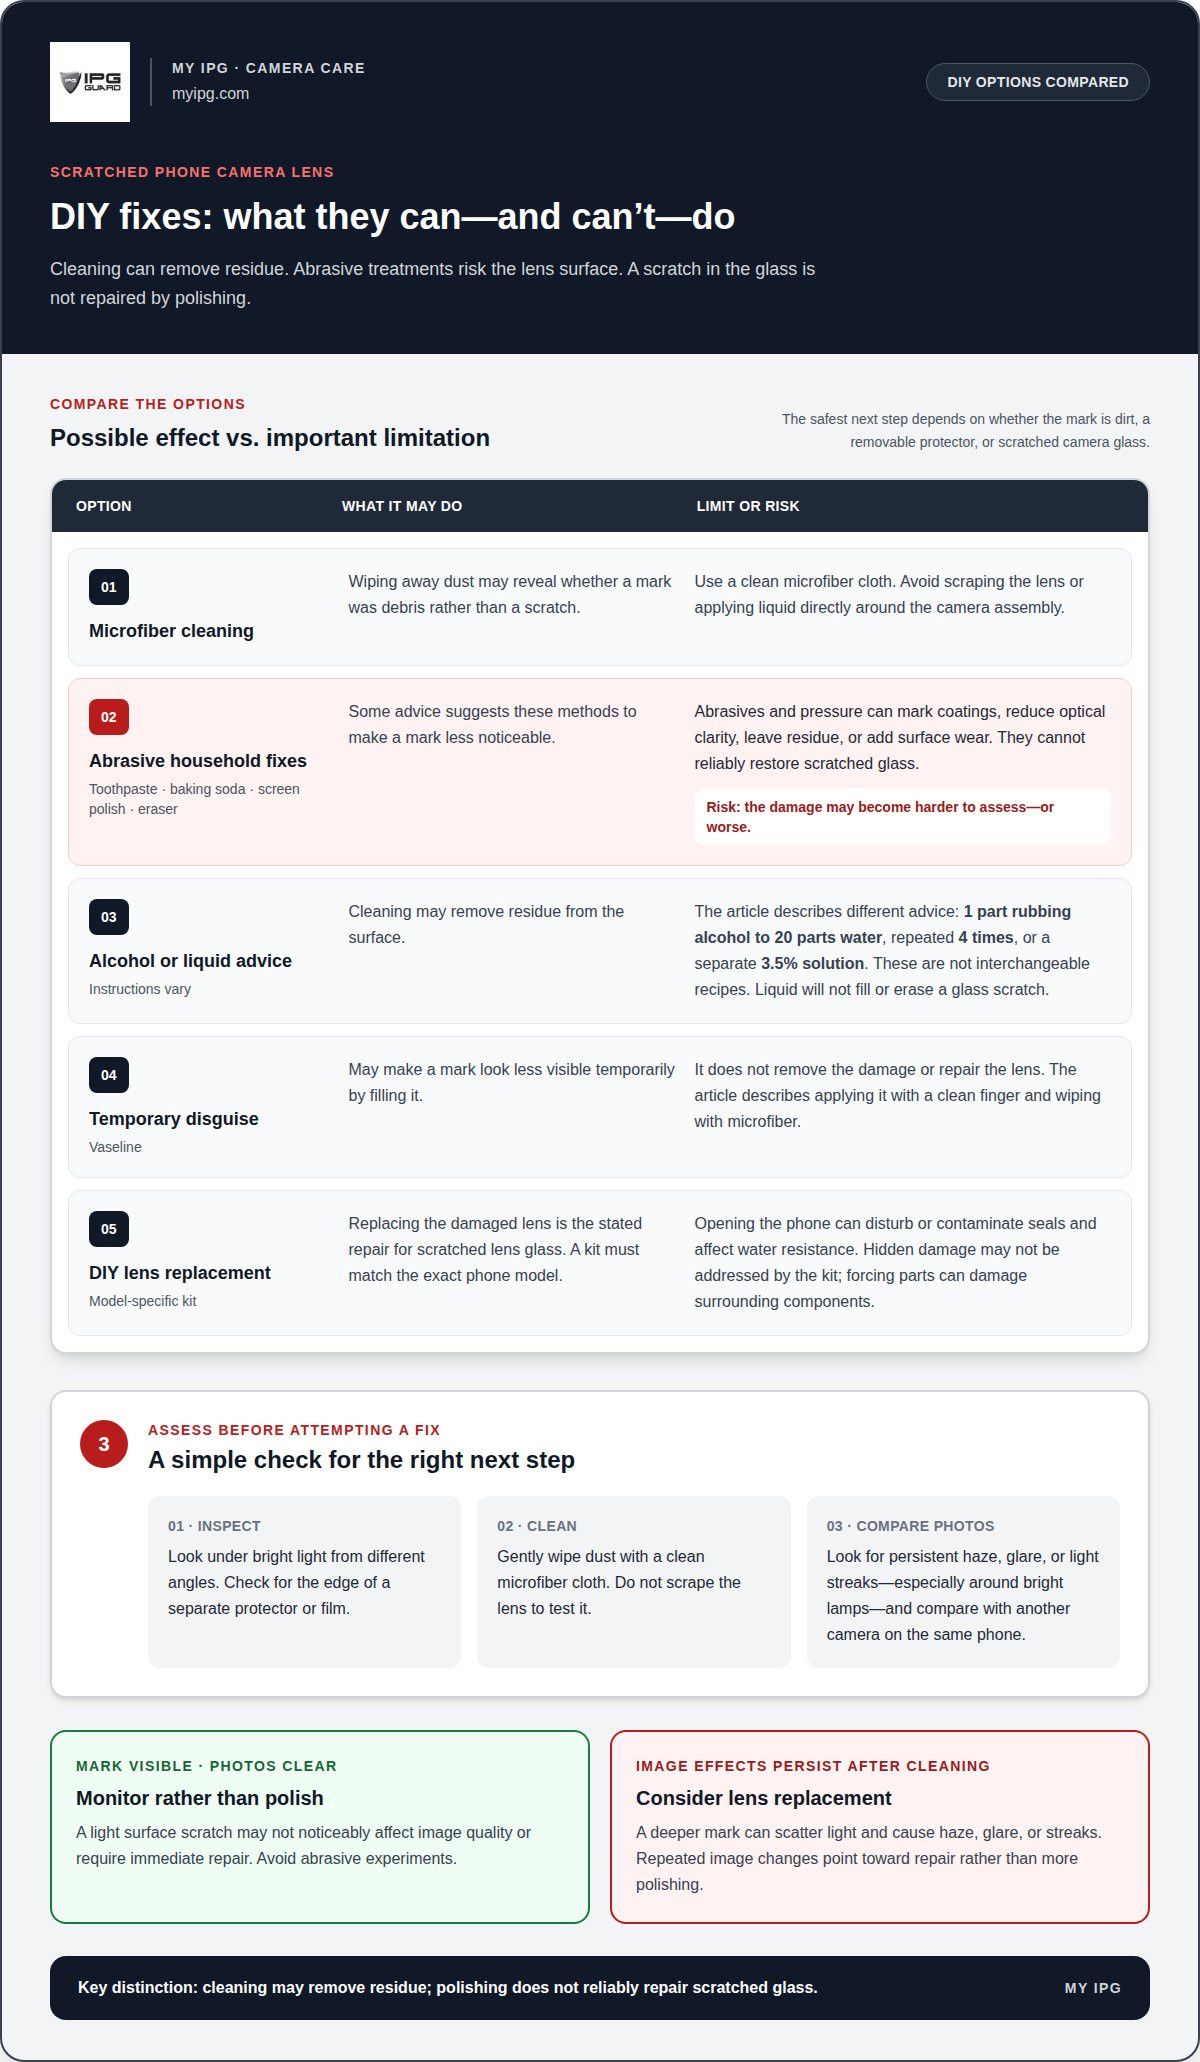
First, identify which surface is scratched. Inspect the camera area under bright light from different angles, looking for the edge of a separate protector or film. If a removable protector is marked, taking it off may show whether the camera glass underneath is intact. Don’t scrape the lens to test it. Wipe away dust with a clean microfiber cloth, since particles can look like fine scratches.
Common household fixes don’t restore scratched glass. Toothpaste may contain abrasive particles that mark a lens coating, and baking soda can be too abrasive for a delicate camera surface. Rubbing either onto the lens creates friction, while excess liquid can enter around the camera assembly. These methods may leave images hazy or make the damage harder to assess.
Some DIY advice calls for diluting one part rubbing alcohol with 20 parts water, then repeating the cleaning four times. Other advice names a 3.5% rubbing-alcohol solution. These are different instructions, not interchangeable recipes. Cleaning may remove residue, but it won’t fill or erase a scratch in the glass. Avoid applying liquid directly to the camera; use a lightly dampened microfiber cloth only for surface dirt.
Other suggested remedies include rubbing a banana piece dipped in baking soda over the scratch for at least 2 minutes, or applying toothpaste rather than tooth gel for 5 minutes. Advice also suggests wiping away toothpaste with a microfiber cloth and a drop of water. These treatments can abrade the lens surface rather than repair it. Vaseline, applied with a clean finger and wiped with microfiber, may make a mark look less visible by filling it temporarily, but it doesn’t remove damage.
- Screen polish: Some instructions suggest polishing for 2-3 minutes. Abrasive compounds can affect coatings and optical clarity.
- Pencil eraser: Advice recommends a clean, unused eraser moved along the scratch in one direction. Pressure can still leave residue or add surface wear.
Compare photos taken with the affected camera to photos from another camera on the same phone. Look for persistent haze, glare, or light streaks, particularly around bright lamps. If cleaning doesn’t change the results, the scratch may be on the lens itself. Replacing the camera lens is the only safe way to fix scratched glass; polishing risks worsening the surface. To stop phone camera lens scratch repair costs from escalating, begin by avoiding abrasive experiments and distinguishing dirt from actual damage.
DIY options for scratched phone camera lenses
A DIY camera-lens kit is an option if you’re prepared to open your phone and replace the damaged cover. Those figures describe the kit and estimated time, not the repair’s difficulty or risk. Phone models have different camera layouts, so a kit for one model may not fit another.
A scratch-repair kit designed for digital camera lenses may seem suitable for a phone, but a phone’s camera assembly is built into a compact device, not an interchangeable lens housing. A polishing kit can’t restore deeply scratched glass. Replacing the damaged lens is the only safe way to fix a scratch in the lens itself.
Before opening a phone, consider the main risk: disturbing or contaminating its seals can reduce water resistance. Even a repair focused on the camera area may affect those seals during disassembly or reassembly. If the phone has been exposed to moisture, dust, or impact, internal parts may already be affected. A DIY kit only addresses the parts it contains; it won’t assess hidden damage.
If you proceed, make compatibility and careful handling priorities. Match the replacement part to your exact phone model, follow the kit’s instructions, and don’t improvise with tools or adhesives. Keep small components organized as you remove them. Avoid touching the camera optics, and stop if a part resists removal. Forcing a lens cover, for example, can damage surrounding components and turn a limited repair into a more involved problem.
- DIY may suit: Someone who can identify the exact phone model and follow model-specific repair instructions.
- DIY is a poor fit: A phone with uncertain compatibility, signs of moisture, or a camera that already produces distorted images.
- Replacement is the goal: Polishing may disguise a mark, but it doesn’t repair scratched lens glass.
Choose an approach based on what needs fixing. Replacing a scratched removable protector is different from opening the phone to replace its camera lens. If the lens itself is damaged, weigh the kit’s model compatibility and repair steps against the risk to the phone’s seals. A low-cost kit doesn’t make a delicate repair risk-free, and a DIY attempt can leave the camera less protected than before.
Minor and deep lens-surface scratches
A light surface scratch may not noticeably affect image quality or require immediate repair. A deeper mark can scatter light, causing haze, glare, or streaks in photos, especially around bright sources. Consider repair when those effects persist across images after the lens is clean.
Compare photos from the affected camera with images from another camera on the same phone. Try a bright scene and a dim one, then look for repeated blur or flare in the same area. If the mark is visible but the images remain clear, monitor the camera rather than trying an abrasive fix. If image quality has changed, consider lens replacement instead of more polishing.
Scratch depth can help guide the repair decision. Minor scratches may be polishable, while deeper scratches may require replacement of the lens element.
Those model ranges show why the phone’s generation matters, but the mark’s effect on images matters too. A shallow scratch on an iPhone 14 may leave photos unaffected, while a deeper scratch on the same model may produce persistent glare. Don’t treat scratch visibility alone as proof that the camera needs repair. Assess the surface carefully, clean away ordinary smudges, and compare test photos before deciding.
- Minor mark: Photos look clear, with no repeated haze or flare. Avoid aggressive polishing and watch for changes.
- Deeper damage: The scratch remains visible after cleaning, and multiple images show the same distortion. Lens replacement may be necessary.
- Unclear result: Compare images from different camera lenses on the phone. If only one camera shows a consistent artifact, that helps isolate the affected lens.
Balance image quality against the repair cost for your exact phone model. Different damage may call for different repairs, so don’t assume every scratch needs the same work. A careful assessment is preferable to repeated DIY attempts, which can add surface wear without removing deep damage.
Preventing scratches with a case or screen protector
A case and a camera lens protector guard against different kinds of contact. A case helps keep the rear camera lens away from objects when you set down or carry your phone. A lens protector adds a layer over the camera area. Together, they create two barriers between the camera glass and everyday surfaces such as a desk, bag, or pocket.
Check how the case sits around the rear cameras. When the phone rests on its back, the camera area should not press directly against a table. A case that leaves the lens exposed may protect the phone’s edges, but does less to prevent contact with flat surfaces. Notice where the camera touches when you set the phone down, then choose a case that keeps that area clear.
A camera lens protector provides a separate safeguard for the rear camera. Choose one designed for your phone’s camera layout, since lens positions and shapes vary by model. A poorly aligned protector may cover part of the camera opening or leave exposed glass unprotected. Fit matters: a correctly positioned layer helps protect the camera surface from direct contact with small objects during everyday use.
The front camera needs a different approach. A screen protector may protect the front camera area if it is compatible with your phone. Check the camera opening before applying it. If the protector overlaps the lens, images may look obstructed. A clear, correctly aligned opening keeps the front camera usable while the protector covers the screen.
- For the rear camera: Pair a case that keeps the camera away from surfaces with a protector designed for that camera layout.
- For the front camera: Use a screen protector with a clear opening aligned to the selfie camera.
- For daily handling: Keep the phone separate from loose objects that could press or rub against camera glass.
Inspect the case and protectors when you clean your phone. Look for a shifted edge, trapped dust, or a visible mark on the protective layer. If the protector is scratched, the mark may be on that layer rather than the camera glass underneath. Remove loose particles before wiping with a clean microfiber cloth, so grit doesn’t rub across the surface.
Protection works best when each layer has a clear purpose: the case helps keep the rear camera away from objects, while camera and screen protectors cover exposed surfaces. A phone carried in a bag, for example, may encounter keys or other loose items, so a separate pocket adds another practical barrier. These steps can help prevent new contact damage, but they can’t repair an existing scratch.
Does phone insurance or a manufacturer warranty cover camera lens scratches?
Start by reviewing the manufacturer’s warranty. It may be the least expensive repair route if it covers some or all of the camera lens repair cost. Coverage depends on the warranty terms and the type of damage. A scratch that appears during the coverage period isn’t automatically covered just because the phone is still under warranty.
Read the warranty terms for camera, lens, and physical damage before deciding what to do. Note the coverage period, the types of damage addressed, and whether the document describes a repair or replacement process. One warranty may cover some camera lens repair costs, while another may not cover that particular scratch. The written terms determine what applies.
Phone insurance is a separate option. A policy may cover camera lens repair, depending on its terms. Find the section on device damage and camera repairs, then compare its wording with the damage to your phone. A plan that covers one type of damage may treat another differently. Don’t assume that “phone protection” means every scratch qualifies.
Consider the repair decision alongside the coverage. Phone camera lens repair typically falls between $75 and $87 on the market. That market range gives you a reference point, not a promise of what a particular repair will cost. The exact phone model and the work required affect the repair decision, while warranty and insurance terms determine whether coverage applies.
- Warranty: Look for the coverage period and language about camera lens repairs or physical damage.
- Insurance: Read the policy section on device damage and camera repairs, then compare it with your situation.
- Repair choice: Weigh the market repair range against the camera’s actual image quality and the phone model.
Keep the details clear when reviewing coverage. Identify your phone model, describe where the scratch is, and note whether photos show haze or glare. This makes it easier to compare the damage with the warranty or policy terms. A visible mark with clear images, for instance, calls for a different repair decision than a scratch that repeatedly distorts photos.
Using the warranty first may be the least expensive option when its terms cover the damage. If it doesn’t, insurance may still cover some or all of the repair, depending on the policy. If neither applies, weigh the repair cost against the scratch’s effect on photos and the phone’s value. Avoid abrasive polishing while you decide; it can alter the surface and make the damage harder to assess.
My IPG: IPG Phone camera lens protector
My IPG’s IPG Phone camera lens protector adds a protective layer over your phone’s camera area, helping reduce direct contact with objects that can scratch the lens. It’s a preventive option for an undamaged camera, not a repair for scratched glass. My IPG also offers the IPG Camera Lens Protector for iPhone Samsung Tempered glass for camera protection.
Choose protection before everyday wear leaves a mark, and pair it with a case that keeps the camera area away from surfaces. Match the protector to your phone’s camera layout so it covers the intended area without obstructing the lens. For questions about protecting your phone camera, contact My IPG.
Protect your next photo opportunity
Match your next step to the damage: avoid risky polishing, preserve clear camera performance, and add protection before everyday contact leaves another mark. Preventive care is a practical way to stop phone camera lens scratch repair costs from becoming a recurring concern.
My IPG offers IPG iPhone screen protector and IPG Samsung screen protector options for phone screens. For camera protection, choose a safeguard suited to your device and its camera layout. The right fit helps protect the device without treating protection as a repair for existing damage.
Ready to explore protection for your phone? Contact My IPG for help and take a thoughtful next step toward keeping your device ready for the moments ahead.
Frequently Asked Questions
Do Camera Lens Scratches Lower Your Phone Value?
Yes. A scratched phone camera lens can reduce resale value by 15% to 30%. The effect depends partly on how visible the damage is and whether it affects photos. For example, a buyer comparing two phones in similar condition may view visible camera damage as a reason to offer less. Check the camera’s image quality and the phone’s overall condition when estimating its resale value.
How Much Does Camera Lens Repair Cost?
Phone camera lens repair typically costs between $75 and $87 on the market. That range is based on seven price samples from two sources, so it’s a broad reference rather than a model-specific quote. The phone model and whether the work is limited to the lens or involves additional camera components affect the final amount. Compare the repair estimate with your phone’s current value before deciding.
Repair or Replace: Which Makes Sense?
Compare the repair amount with the phone’s current value and how long you plan to keep it. A phone less than 4-5 years old that runs the latest iOS may be a repair candidate. The camera’s effect on everyday photos should also influence the decision.
How can you prevent scratches on a phone camera lens?
Use a case that keeps the rear camera away from objects, and add a camera lens protector that fits your phone’s camera layout. Keep the phone in a separate compartment from loose items, and avoid placing it on gritty surfaces. Before wiping the lens area, remove loose particles so they don’t rub across the surface and leave more marks.
Can scratches on a phone camera lens be repaired at home safely?
Removing dust at home is different from repairing scratched lens glass. Abrasive methods such as toothpaste can damage the surface rather than restore it. Replacing the lens is the only safe way to fix a scratch in the glass, but DIY disassembly can disturb or contaminate the phone’s seals and affect water resistance. A replacement kit doesn’t eliminate that risk.
What is the cost to replace a phone camera module versus just the lens glass?
The cost depends on whether the damage calls for a lens-only repair or a camera module repair. That difference is why persistent image problems deserve attention: the repair may involve more than the outer lens glass. Compare the repair scope with your phone’s value before choosing what to do.