

Protect the display by matching the protector to the exact tool. Effective diagnostic tool display protection is cut for a specific model and generation; similar screen measurements alone don’t guarantee compatibility. Choose a protector designed for your equipment before ordering.
Shop displays face regular handling, and scratches, scuffs, dust, and everyday wear can take a toll. The right fit adds a protective layer without assuming similar-looking screens are interchangeable. This guide explains how to identify compatible protection, check pack quantities, and compare options against your tool’s model and generation. You’ll also learn what display protection can help guard against, and where its limits are, so you can make a considered choice for the equipment you rely on.
Key Takeaways
- Match protection to the diagnostic tool’s exact model and generation; similar screen measurements don’t ensure a fit.
- Learn what a display protector can help shield against, including scratches, scuffs, dust, and routine shop wear.
- Compare pack quantities and choose an option that suits the number of tools you need to protect.
- Understand how a screen protector sits over the display and what to consider when replacing worn protection.
- Explore My IPG’s phone camera lens protector for added protection for a phone camera lens.
Protection from scratches, scuffs, dust, and shop wear
A diagnostic tablet may share a bench with sockets, leads, and metal tools. A loose extension or sharp tool edge can scrape its display during ordinary work. A fitted protector adds a sacrificial surface between the screen and light contact. It can help limit visible scratches and scuffs, but it cannot prevent damage from every impact or pressure point.
Dust creates a different problem. Fine particles can collect around display edges or beneath a poorly fitted film. Wiping a dusty screen with a dry sleeve may drag grit across the surface. First remove loose dust with a clean, soft cloth, then wipe gently rather than pressing particles against the screen.
Repeated handling also adds shop wear. Gloves, oily fingertips, and frequent movement between a cart and vehicle can leave marks. A protector gives routine contact a replaceable surface. It doesn’t keep the whole tool clean, seal its housing, or protect exposed buttons and ports. Keep the device away from abrasive debris whenever practical.
Warranty terms come from the diagnostic tool’s manufacturer. A protector doesn’t extend or replace them. Keep the screen visible and controls responsive. Don’t cover ports, labels, or openings.
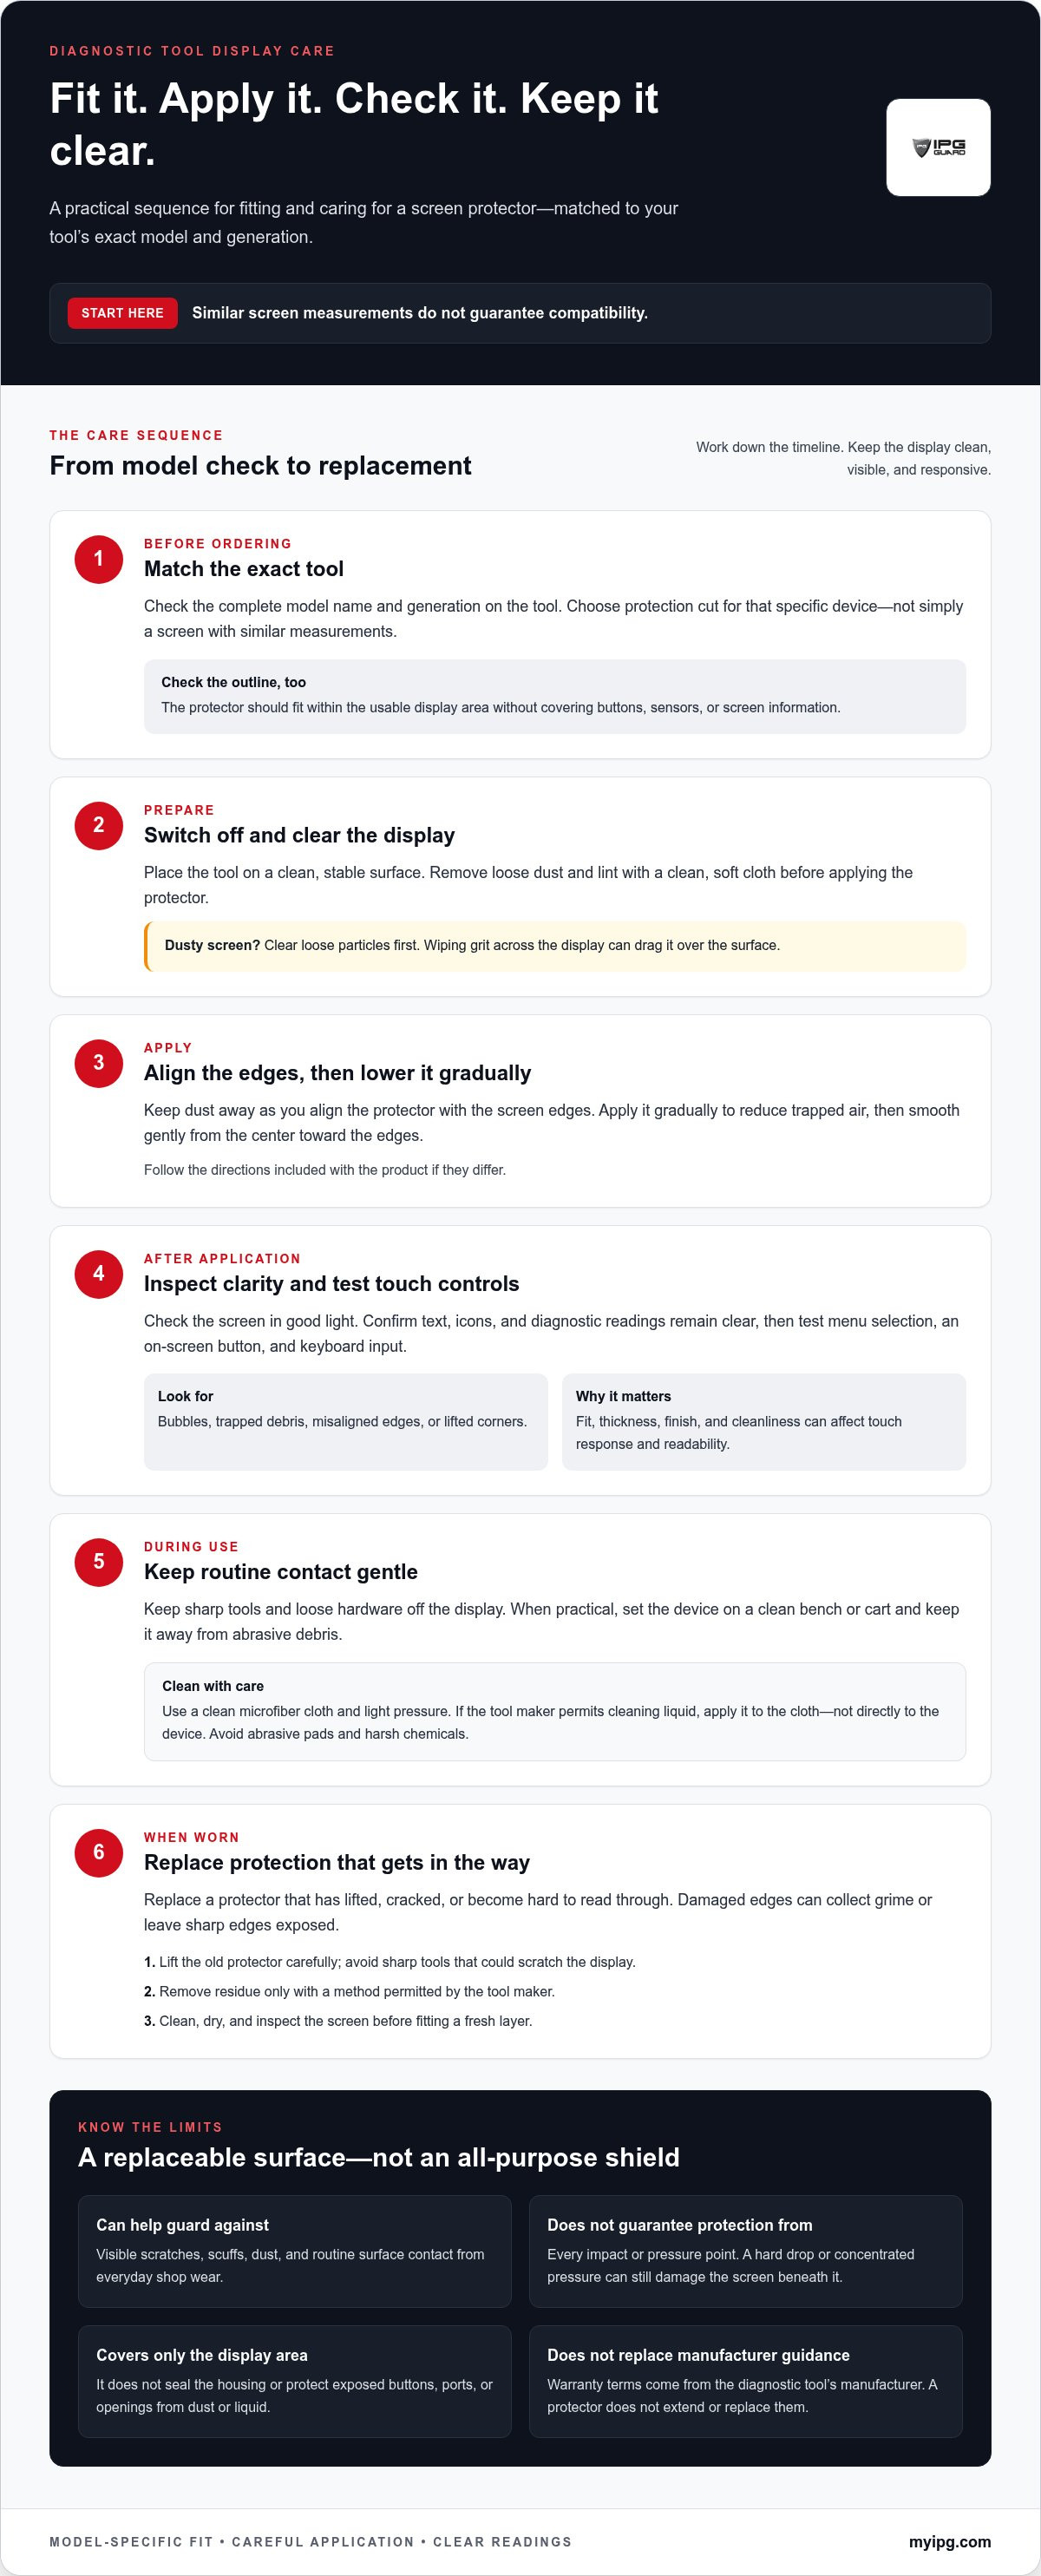
To install a protector, switch off the tool and use a clean, stable surface. Wipe the display with a soft cloth, remove lint, and align the protector with the screen edges. Apply it gradually to reduce trapped air. Follow the product’s included directions if they differ.
Maintain the surface with a clean microfiber cloth and light pressure. If the tool maker permits cleaning liquid, apply it to the cloth, never directly to the device. Avoid abrasive pads and harsh chemicals, which may damage the protector or display coating.
Touch response and readability depend on the protector’s thickness, finish, fit, and cleanliness. Misaligned edges, trapped debris, or bubbles can interfere with taps or obscure readings. After installation, test common controls, including menu selection and on-screen keyboard input.
- Before work: Check for grit, oil, and chips. Clear debris before wiping.
- After application: Inspect the screen in good light. Confirm text, icons, and touch controls remain usable.
- During use: Keep sharp tools and loose hardware off the display. Set the device on a clean bench or cart.
- When worn: Replace a protector that has lifted, cracked, or become hard to read through. Damaged edges can collect grime.
Protection works best alongside careful handling. A correctly aligned layer can take everyday surface contact, while routine cleaning helps preserve clear readings. A well-fitted protector helps preserve a diagnostic tool’s display, but doesn’t replace careful use or the tool maker’s care instructions.
How does a diagnostic tool screen protector work?
A screen protector is a thin layer placed over a display, creating a surface between the screen and everyday contact. For example, a glancing brush from a tool may mark the protector instead of the display. The overlay isn’t a shield against every impact. A hard drop or concentrated pressure can still damage the screen beneath it.
Fit matters because the protector must sit within the display’s usable area. A correctly aligned edge helps avoid covering buttons, sensors, or screen information. A loose corner can catch on a glove or collect dirt. An overlay cut for another housing may leave part of the glass exposed. Match the protector to the tool model and generation before applying it.
Most protectors attach directly to the display surface. The contact layer holds the overlay in place, while the outer face receives routine touches and wiping. Air pockets or dust trapped underneath can affect appearance and touch input. Clean the screen first, then lower the protector gradually. Smooth it gently from the center toward the edges.
Touchscreens still need your finger’s input to reach the display. A thin, clean, well-fitted layer generally allows normal interaction. Thick residue, bubbles, or a lifted edge can make tapping less consistent. After application, test a menu, an on-screen button, and keyboard entry. Check that text and diagnostic readings remain clear from your usual working angle.
Protection doesn’t make the tool’s housing dustproof or waterproof. It covers only the area beneath the overlay. Dust can still enter through openings, and liquid can still reach exposed edges. Keep the device away from spills and follow its manufacturer’s care directions. Treat the protector as a replaceable surface, not a repair for damaged glass.
To replace a worn or peeling protector, lift it carefully. Avoid sharp tools that could scratch the display. Remove residue using a method permitted by the tool maker. Then clean, dry, and inspect the screen before applying a fresh layer. Replace a cracked overlay if it obstructs readings or leaves sharp edges exposed.
- Before applying: Confirm the tool model and protector cut match.
- During application: Keep dust away and align the edges.
- After application: Test touch response and inspect screen clarity.
For diagnostic devices such as the Autel MaxiIM KM100 and MaxiSYS MS909, compare model-specific options like screen protection for diagnostic tools. To protect a diagnostic tool’s display, choose a protector that fits its screen and keeps on-screen controls accessible.
What screen protector size fits popular diagnostic tools?
There isn’t one universal screen size for diagnostic tools. Protectors are cut for specific display sizes and housings. Similar screen measurements don’t guarantee that two models fit alike. Choose a protector matching the exact tool model and generation. A close-looking outline can still misalign around the bezel or controls.
Start with the model label on the tool itself. Record the complete name and generation, including letters or suffixes. For example, Autel MaxiIM KM100 and MaxiSYS MS909 identify different diagnostic tools. A protector described only by approximate screen size may not match either housing. Use the equipment model as your first fit criterion.
Next, distinguish the visible glass from the active display. The glass may extend beyond the lit image area. A protector made for only the active area can leave exposed edges, while one cut to the outer glass may overlap a bezel. Compare the protector outline with the tool’s actual display, including rounded corners and nearby buttons.
Use this practical fit check before selecting a size:
- Identify the tool: Read its model and generation from the device label or settings.
- Find the display boundary: Note the glass edges, corner shape, bezel, and any nearby controls.
- Compare the cut: Check the protector’s stated compatibility against the complete model name.
- Inspect the placement: Confirm the outline leaves buttons, sensors, and display edges unobstructed.
If measuring is necessary, use a ruler to record the glass width and height. Measure the display area separately, and label each measurement clearly. A diagonal measurement alone cannot describe corner shape, bezel spacing, or housing cutouts. For example, two rectangular screens with the same diagonal can still have different proportions.
Generation matters, too. Manufacturers can change housings or display layouts between revisions. A protector sized for an earlier MaxiSYS version may not follow a later model’s outline. Match the full model identifier, not just the brand name or product family. Don’t treat MaxiCharger, MaxiIM, and MaxiSYS as interchangeable labels.
Before applying a replacement, hold it above the clean display and align its edges without pressing it down. Check the corners and control clearance from several angles. If the outline doesn’t align, stop and compare the model information again. Accurate model matching protects coverage and keeps the display usable.
How much do diagnostic tool screen protectors cost?
The amount depends on the protector and purchase format. Compare products made for the same diagnostic tool. A model-specific cut and a generic sheet aren’t equivalent options. For example, protection for an Autel MaxiIM KM100 should match that tool’s display shape. Compare fit before comparing listed amounts.
Pack quantity changes the comparison. A single protector and a pack containing replacements have different per-piece value. Check the item count in each listing, not only its headline amount. If your shop protects several tools, count the compatible devices first. A pack only offers useful value when its pieces fit those devices.
Compatibility can influence the price because each display has its own dimensions and outline. A protector for MaxiSYS MS909 may not fit another MaxiSYS generation. A model-specific cut is different from a sheet trimmed by hand. Compare the exact model name, generation, and display before treating two listings as comparable.
Material and finish can also affect the price. A clear protector, a matte surface, or another finish may use different construction. These options can change how reflections, fingerprints, and screen clarity appear. Compare the stated features with your shop conditions. Don’t pay for a finish that doesn’t serve your display needs.
Read the listing carefully. Separate the protector itself from any included tools or accessories. Check whether the quantity describes individual pieces or a set. Then review the shipping and tax shown for your order location. Those charges affect the final total, even when the item listing looks comparable.
Use this quick comparison when evaluating options:
- Model fit: Match the full diagnostic tool name and generation.
- Pack count: Compare the number of compatible protectors provided.
- Material and finish: Consider clarity, glare, and routine cleaning.
- Order total: Include shipping and applicable taxes.
For a repair shop, calculate value by expected use, not headline cost alone. A replacement pack can reduce repeat ordering if each piece fits a tool in your inventory. A low-cost sheet that needs trimming may take extra time and leave edges exposed. Consider fit, quantity, and application effort together.
Before checkout, confirm the product description names your exact device. For example, Autel MaxiIM KM100, MaxiSYS MS909, and MaxiSYS MS919 are distinct model identifiers. Compare the pack contents and final order total for the same model. That simple check makes the cost comparison more useful and helps avoid buying an incompatible protector.
Where can I buy replacement display protection for a diagnostic tool
Start with a listing that names your exact diagnostic tool. The model name matters more than a broad category label. For example, Autel MaxiIM KM100 and MaxiSYS MS909 identify different devices. A listing that says only “Autel screen protector” may not identify the correct cut. Match the complete model and generation before selecting a replacement.
Tool manufacturers may list compatible accessories in product documentation or accessory catalogs. Use the device’s full model identifier when searching those materials. A model family name alone can cover different housings. For example, MaxiSYS MS909 and MS919 should be treated as separate identifiers. Look for an explicit compatibility match, not just a similar screen size.
Specialist display-protection listings can also organize products by equipment model. Search using the tool name plus “screen protector” or “display protector.” Then compare the stated device fit, product outline, and pack contents. A close match in diagonal measurement does not establish compatibility. Check the listing description against the label on your tool.
Use this purchase checklist before choosing a replacement:
- Read the device label: Capture the full model name and generation.
- Match the listing: Look for that exact identifier in compatibility details.
- Review the cut: Compare display edges, corners, and control openings.
- Check the pack: Confirm the number of protectors included.
A repair shop can keep a simple model inventory. Record each tool’s brand, model, and generation in one equipment list. For example, separate entries for MaxiIM KM100, MaxiSYS MS909, and MaxiSYS MS919 make replacement searches clearer. This also helps staff avoid ordering by screen appearance alone.
Before ordering, compare the product description with the actual device. Check whether the protector covers the intended glass area and whether its edges will overlap buttons or sensors. Review the listed quantity, shipping details, and return conditions. These details help you assess the order, especially when buying replacements for multiple tools.
For a replacement, remove the worn layer before applying another. Inspect the uncovered display for residue or damage. Clean it according to the tool maker’s care instructions. Apply the new protector only after the surface is dry and free from visible debris. A clean starting surface supports a neater fit and clearer readings.
Keep the purchase record with the equipment inventory. Note the seller description and matching model identifier. When a protector needs replacing, that record gives staff a useful starting point. It also helps distinguish a compatible replacement from a generic overlay that may not fit the diagnostic tool.
My IPG: IPG Phone camera lens protector
The IPG Phone camera lens protector adds a protective layer for a phone camera lens used around the repair bay. It complements, rather than replaces, a diagnostic tool screen protector. Keep each accessory matched to its device: a phone lens protector is for a phone camera, while diagnostic equipment needs a protector cut for its specific display.
My IPG also offers iPhone and Samsung screen protectors, plus camera lens protection for iPhone and Samsung devices. Choose the product category that fits the device you want to protect. For a phone camera lens protector, visit My IPG.
Protect the devices that support your work
Your diagnostic scanner is only one part of a repair workflow. The phone used for photos, reference images, or customer updates also deserves care in a busy shop. Thoughtful diagnostic tool display protection can sit alongside protection for the devices you use throughout the workday.
My IPG offers the IPG Phone camera lens protector, IPG iPhone screen protector, and IPG Samsung screen protector. Choose protection based on the device in your hand, not simply the task you’re doing. Keeping everyday devices in better condition helps you focus on the repair rather than avoidable wear.
If you’re considering protection for a phone or diagnostic display, take the next step at your pace. Explore display protection options at My IPG and find a suitable direction for the equipment you rely on. Keep your tools ready for the next job.