


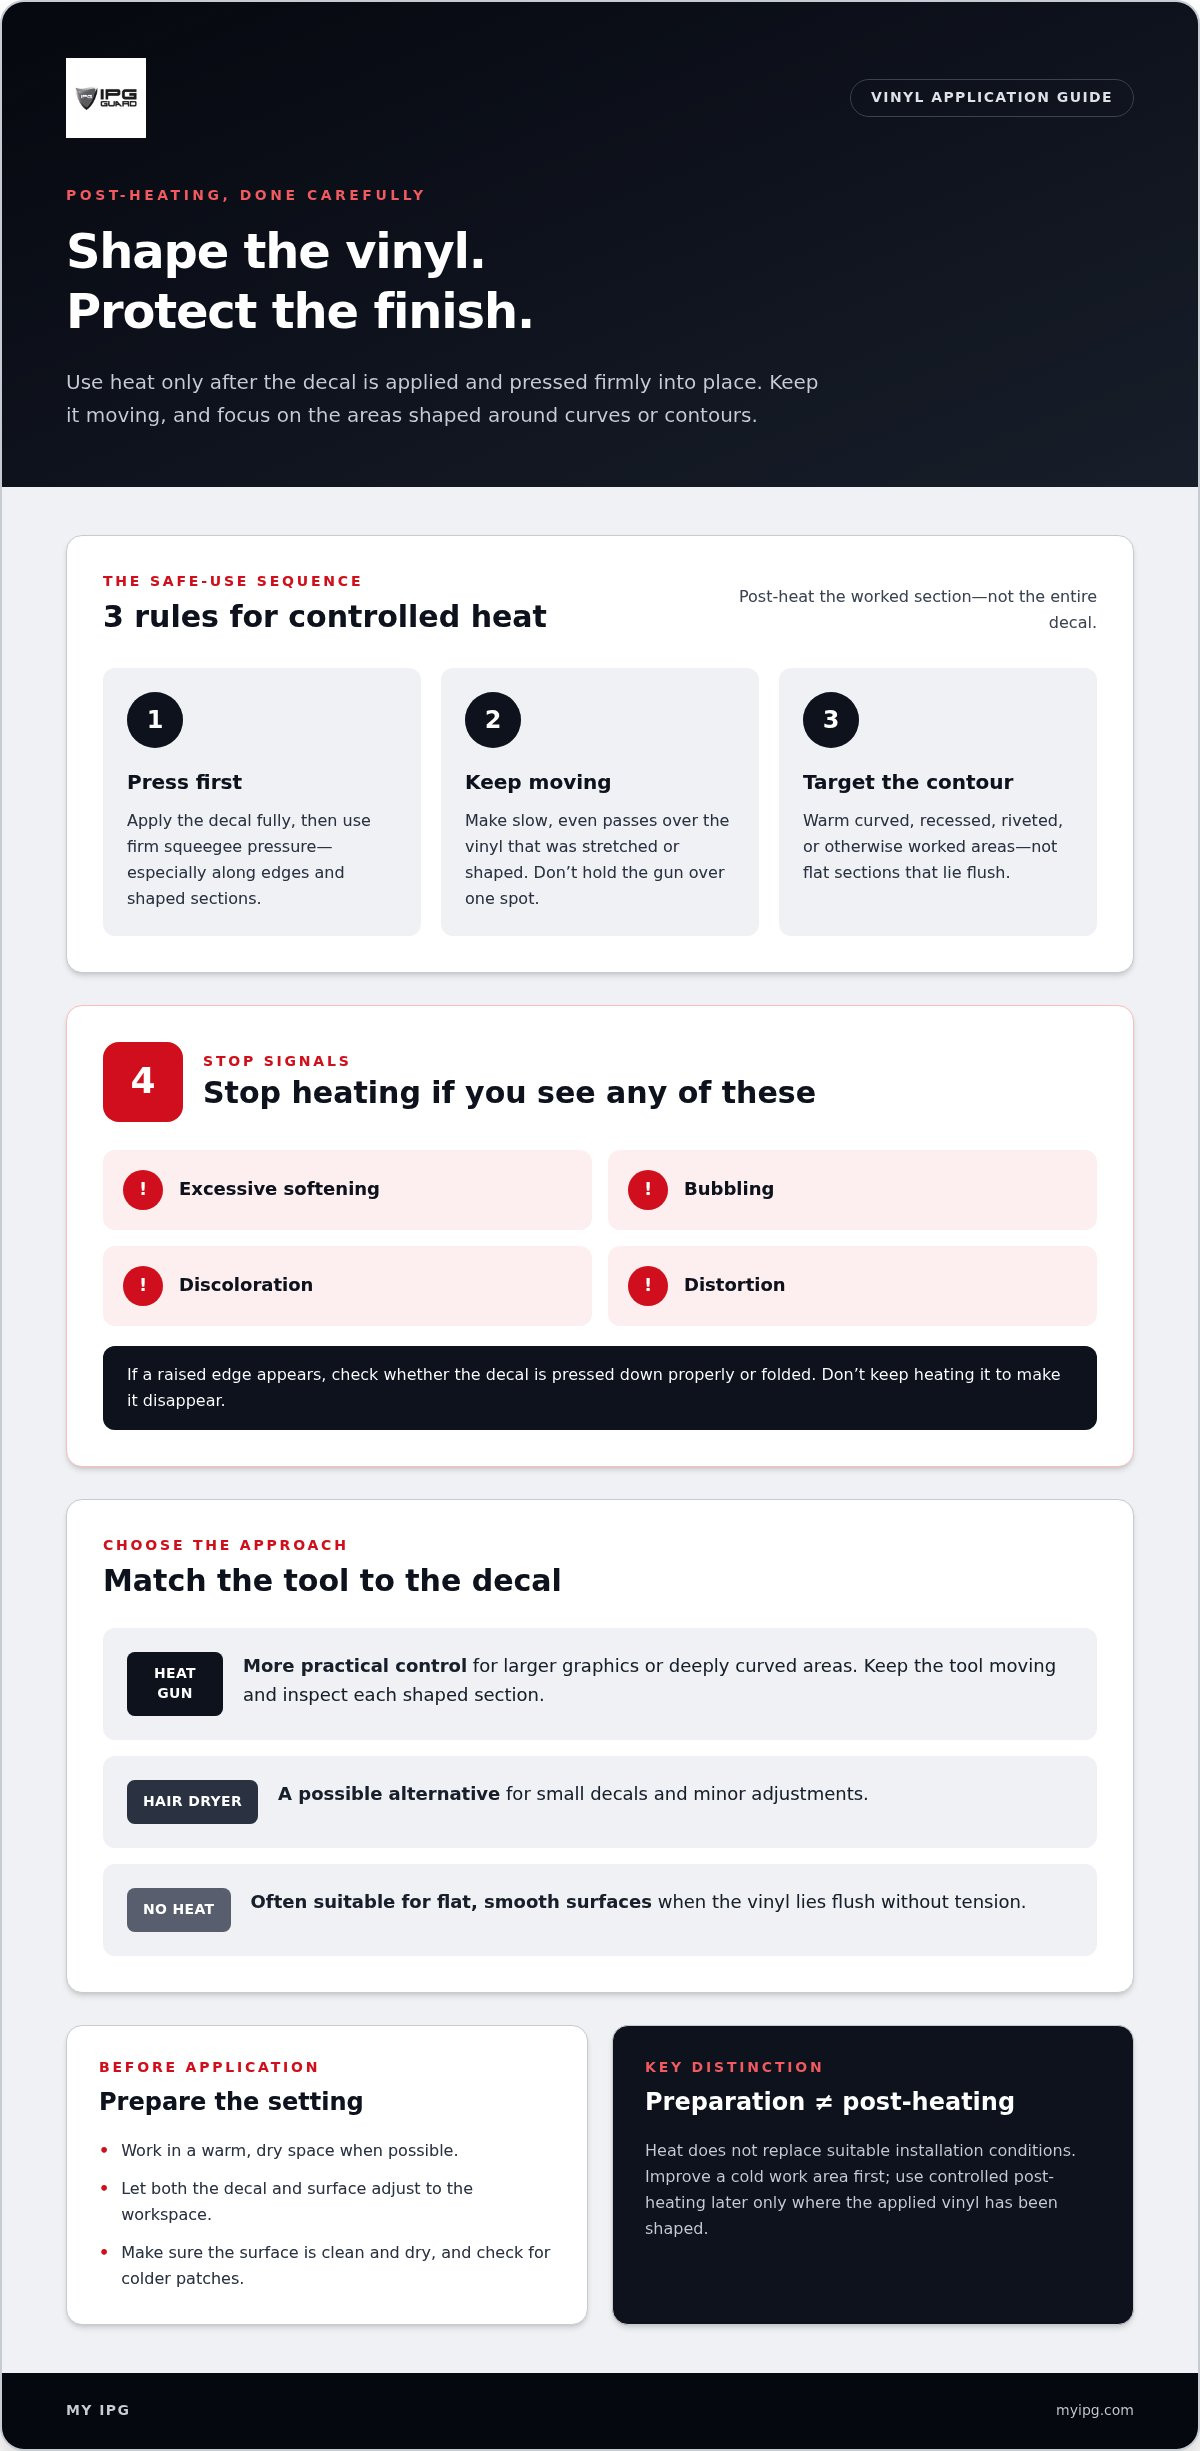
A heat gun can help a vinyl decal hold its shape on curves and contours, but use heat only after applying the decal and pressing it firmly into place. When using a heat gun for vinyl decal application, keep it moving in slow, even passes. Stop if the vinyl softens excessively, bubbles, discolors, or distorts. Focus on stretched or shaped areas, not the entire decal.
It pays to be cautious: heat can help vinyl conform, but too much in one spot can damage it. A warm, dry workspace and a surface that isn’t excessively cold make positioning and adhesion easier. Firm squeegee pressure also helps the adhesive bond.
This guide explains when post-heating is useful, how to apply heat carefully, and when a hair dryer or no added heat may be a better fit. You’ll also learn why curved, recessed, or riveted areas need a different approach from flat surfaces, helping you protect the finish and keep the decal sitting cleanly.
Key Takeaways
- Work in a warm, dry setting; cold vinyl and surfaces can make positioning and adhesion more difficult.
- Press the decal firmly into place before post-heating, and focus heat on areas shaped around contours.
- Keep the heat gun moving in slow, even passes. Stop if the vinyl softens excessively, bubbles, discolors, or distorts.
- A hair dryer may suit small decals and minor adjustments, while a heat gun offers more practical control for larger or deeply curved graphics.
- Flat, smooth surfaces often need no post-heating when the vinyl lies flush without tension.
Cold surfaces and installation conditions
Cold conditions affect vinyl before the decal touches the surface. The material becomes less flexible, and its adhesive can be harder to position and press firmly into place. A decal brought in from a cold storage area, for example, may resist conforming to a curved panel. A cold glass surface can also make alignment and firm contact more difficult. Heat can help with shaping, but it doesn’t replace suitable installation conditions.
Choose a warm, dry workspace whenever possible. Let the decal and surface adjust to the environment before installation. A cold vehicle panel moved indoors may need time to warm throughout, not just at the edges. Similarly, bringing a decal into a warm room won’t instantly warm its backing or adhesive. Give both time to settle, then make sure the surface is clean and dry before positioning the graphic.
Assess the surface itself, not just the room. A garage may feel comfortable while a metal door or window remains cold. Check different areas of the installation zone, especially shaded sections and edges. If one part feels colder than another, the decal may behave inconsistently during application. On a vehicle, check the panel around the intended placement area. On a laptop lid, let the surface reach room temperature before you begin.
- Warm the setting: Move the work into a warm, dry area when possible.
- Prepare both materials: Allow the decal and surface to adjust to the workspace.
- Inspect the placement zone: Look for dampness, dust, and noticeably colder patches.
- Apply firm pressure: Use a squeegee to press the decal evenly against the surface.
Firm squeegee pressure matters because vinyl uses a pressure-sensitive adhesive. Work across the decal with steady strokes, pressing from the center toward the edges. For a small laptop graphic, this helps smooth the film and establish contact without relying on heat. On a broad panel, overlapping strokes help you cover the full graphic. Pay attention to corners and narrow edges, where incomplete pressure can leave sections poorly seated.
Don’t use a heat gun to compensate for an excessively cold surface. Cold vinyl is less flexible and harder to position and shape; heating one area may soften it without warming the entire installation zone evenly. Improve the conditions first. After placing and pressing the decal, heat can serve a different purpose on vinyl shaped around contours. Prepare for adhesion, then use controlled heat only where shaping calls for it.
A decal on a flat storefront panel, for example, may need careful placement and pressure but no added heat. A graphic applied to a cold, shaded vehicle panel needs better preparation before installation. In either case, a warm, dry setting makes the vinyl easier to handle. Check the entire placement area, align the decal carefully, and press it firmly into contact.
Even heating and avoiding vinyl damage
A heat gun concentrates warmth, so you control how much heat reaches each part of the decal. Keep the tool moving in slow, even passes rather than holding it over one spot. A stationary nozzle can soften one area while nearby vinyl stays cooler, potentially distorting the graphic or affecting its finish.
Post-heat only after the decal is fully applied and pressed firmly into place. Use a squeegee first, especially along edges and sections shaped during installation. Then move the heat gun steadily across the worked area. If a vehicle decal wraps around a shallow contour, for example, warm that shaped section evenly rather than sweeping over the whole panel.
Watch how the vinyl responds. Stop heating if it softens excessively, bubbles, changes color, or begins to distort. These visible changes indicate that the vinyl is taking too much heat. Don’t keep warming a raised edge to make it disappear; first check whether the decal is pressed down properly or folded.
- Press first: Squeegee the applied decal firmly before post-heating.
- Keep moving: Use slow, even passes across the section that was stretched or shaped.
- Watch the surface: Look for bubbling, discoloration, distortion, or excessive softening.
- Stop promptly: End heating when any damage sign appears.
Small details call for deliberate control. A narrow edge on a curved panel can warm faster than the wider vinyl beside it. Move across the transition instead of aiming continuously at the edge. If the decal has a recessed area, treat each shaped section as its own zone. This avoids heating flat areas that weren’t stretched or worked around an obstacle.
Don’t judge the process by how quickly the vinyl changes. The goal is controlled post-heating, not visible shrinking or dramatic softening. If the graphic starts to ripple or lose color, don’t apply more heat. Pause, assess the surface, and avoid pulling softened vinyl into a new position. Repeatedly heating the same patch can increase the risk of distortion.
For a large graphic, divide the shaped portions into manageable areas. Make a moving pass over one section, then inspect it before continuing. Use the same care with a small decal: a smaller surface doesn’t make stationary heat safer. Using a heat gun for vinyl decal application takes attention to both movement and material response. Steady passes, firm pressure beforehand, and clear stop signals help preserve the decal’s shape and finish.
Post-heating cast vinyl on curves and contours
Cast vinyl is designed to conform more readily to curves and complex surfaces. Post-heating can be useful where installation stretches or shapes the film, such as a vehicle decal wrapped around a rounded panel, pressed into a recess, or worked around rivets. These areas demand more from vinyl than a flat panel does. Post-heating can help the applied decal hold its shape, but it comes after placement, not before.
Complete the application first. Press the vinyl firmly into place, including the edges and shaped sections, before using a heat gun. Heating a loose or unpressed area can warm the film before it has settled against the surface. For example, press a graphic into a shallow body contour with a squeegee, then focus post-heating on the section following the curve. The order matters: apply, press, then heat the shaped area.
- Position the cast vinyl across the surface and align the design.
- Press it firmly into place, working the film around the contour.
- Identify sections stretched or shaped during application.
- Post-heat those sections with slow, even passes while watching the vinyl.
Let the surface shape guide where you focus. A broad, flat area may sit flush without stretching, while the transition into a recessed channel may require the film to conform closely. A riveted panel presents another challenge: the vinyl must follow both raised and surrounding areas. In either case, post-heat the sections worked around those contours, not automatically the entire decal.
Cast vinyl’s flexibility helps it conform to complex shapes, but careful application is still essential. Press the film into the curve before heating, so heat supports a shape already formed against the surface. If a crease or raised edge remains, inspect how the vinyl lies rather than trying to flatten it with broad heating. The contour, the amount of stretch, and the film’s contact with the surface determine where post-heating helps.
Keep the heat gun moving in slow, even passes over each shaped section. A curved panel may need attention along its bend; a recessed area may need a separate pass where the vinyl follows its depth. Don’t treat every part of the graphic as if it were stretched. Inspect how the decal follows the surface after each area. Stop if the vinyl softens excessively, bubbles, discolors, or distorts. This focused approach helps the decal retain its formed shape without exposing unstretched areas to unnecessary heat.
Using a hair dryer as an alternative
A hair dryer can provide gentler heat for a small decal or minor adjustment. It may work well for a simple graphic on a flat laptop lid that needs little shaping. The trade-off is control: a hair dryer offers less control than a heat gun and may take longer to warm vinyl. Choose based on the decal’s size and the shape of the placement area, not just which tool is nearby.
For a small decal, a hair dryer can add mild warmth while you adjust a slight edge or make a minor correction. Keep the airflow moving across the vinyl and watch how it responds. A compact sticker on a smooth panel needs less shaping than a graphic wrapped around a deep curve. If the vinyl needs substantial forming, gentler heat may be less practical.
Consider the scale of the job. A heat gun is generally more practical for large graphics, deep curves, or areas that need extensive shaping. Its concentrated, controllable heat can target sections worked during installation. A broad graphic following a recessed vehicle panel, for example, needs more focused treatment than a small, flat decal. A hair dryer may warm a larger area more slowly, making controlled coverage less convenient.
- Small, flat decal: A hair dryer may suit minor adjustments.
- Large graphic: A heat gun is generally more practical for post-heating.
- Deep curve: Use the tool that gives more useful control over the shaped section.
- Slow response: Remember that a hair dryer may take longer to warm vinyl.
Neither tool replaces firm application pressure. Press the decal into place before adding warmth, then focus on sections that needed shaping. On a flat glass panel, a hair dryer may be unnecessary if the vinyl already sits flush. On a small curved edge, gentle warmth may help with a minor adjustment. The difference is how much shaping the surface requires.
Don’t treat a hair dryer as an equivalent to a heat gun for every graphic. Its gentler heat can help with small jobs, but its lower level of control matters on complex contours. Conversely, a heat gun’s concentrated heat is no reason to warm an entire flat decal. Match the tool to the task: consider the decal’s size, the curve’s depth, and how much the vinyl was worked around the surface.
A small emblem on a smooth object, for example, may need no heat or a brief adjustment with a hair dryer. A large graphic fitted around a deep recess is better suited to the heat gun’s more practical control. Either way, watch the vinyl rather than rushing. Stop if it bubbles, discolors, distorts, or softens excessively. Choose the tool that lets you manage the shaped area carefully.
When post-heating is needed or can be skipped
Post-heating is most useful where installation stretched or shaped vinyl around contours. Flat, smooth areas often need no added heat when the decal sits flush without tension.
Effects of Post-Heating on Stretched Vinyl
Post-heating applies controlled warmth after installation to help shaped vinyl hold its formed position. It matters most where the film was stretched around a curve, pressed into a recess, or worked around rivets. A flat section lying naturally against glass has no comparable shaping demand. Focus on the area that changed shape during application, rather than warming the entire graphic. This keeps the treatment relevant to how the vinyl contacts the surface.
Heat Gun Use for Decal Post-Heating
A heat gun is the standard tool for post-heating because it delivers concentrated, controllable heat. Make slow, even passes over the applied, firmly pressed section, keeping the tool moving. If a bubble or wrinkle appears, stop heating and assess the vinyl. Smooth the decal with a squeegee, addressing trapped air or a fold before continuing. To protect the material,
Keep the process controlled: moving passes and close observation are key to avoiding vinyl damage.
Post-Heating Needs by Surface Type
Surface geometry determines whether post-heating is useful. Glass, a laptop lid, or a straight storefront panel usually needs no post-heating if the decal sits flush without tension. A recessed panel, riveted surface, or deep curve can stretch or shape the vinyl, making focused post-heating more useful. For example, treat the section worked into a vehicle’s curved recess, not the flat area beside it. The key is how the vinyl is shaped, not simply the surface material.
Manufacturer Instructions and Heat Settings
Heat-gun recommendations and application instructions can vary by vinyl type, so follow the directions for the specific material. Cast vinyl is designed to conform more readily to curves and complex surfaces; post-heating can help shaped sections hold their form. There’s no universal temperature setting for every decal. Choose a controllable setting suitable for the vinyl, keep the gun moving, and watch how the material responds. Stop if it softens excessively, bubbles, discolors, or distorts.
Limit post-heating to decal sections altered during fitting. Directing warmth to stretched or shaped areas focuses the treatment instead of heating the entire decal.
My IPG: IPG Phone camera lens protector
The IPG Phone camera lens protector offers a device-protection option for readers looking to protect a phone’s camera area. Vinyl decal application and lens protection serve different purposes, so choose the right solution for the surface you want to protect. For screen coverage, My IPG also offers the IPG iPhone screen protector and IPG Samsung screen protector.
If your next project is protecting a phone camera lens rather than applying a decal, explore the IPG Phone camera lens protector. Visit myipg.com or contact My IPG to learn more about its phone protection options.
Protect the Details You Value
Start by deciding what you want to protect, then match the solution to the surface. A vinyl decal changes an item’s appearance; a screen or camera lens protector serves a different purpose. Keeping those goals distinct helps you choose deliberately for each device or graphic.
A careful approach to using a heat gun for vinyl decal application supports a cleaner result, but protection needs don’t end with installation. My IPG offers an IPG Phone camera lens protector, an IPG iPhone screen protector, and an IPG Samsung screen protector for those looking to protect these device areas. Choose the product that fits the item you want to safeguard.
If you’re planning a decal project and want guidance on your next step, contact My IPG for decal advice. Move forward with care, and give every surface the attention it deserves.
Frequently Asked Questions
How do you use a heat gun to apply a vinyl decal step by step?
Apply the decal first, then use heat only where shaping calls for it. When using a heat gun for vinyl decal application, follow this sequence:
- Position the decal on a clean, dry surface.
- Press the vinyl firmly into place with a squeegee.
- Identify areas stretched around a curve or recess.
- Move the heat gun in slow, even passes over those areas.
- Stop if the vinyl bubbles, discolors, distorts, or softens excessively.
This approach separates placement from post-heating and helps prevent unnecessary heat on flat sections.
How far should a heat gun be held from a vinyl decal?
There’s no single working distance that suits every heat gun and vinyl decal. Heat output, decal size, and surface shape all affect how quickly the material warms. Keep the nozzle moving instead of directing it at one spot. Watch the vinyl closely as you work; excessive softening, bubbling, discoloration, or distortion means you should stop heating.
When should heat be used during vinyl decal application, and when should it be avoided?
Use a heat gun after applying and firmly pressing the decal, mainly on vinyl stretched or shaped around contours. A flat decal on smooth glass or a laptop lid can usually skip post-heating if it lies flush without tension. Avoid applying concentrated heat to unstretched sections, and stop if the vinyl bubbles, discolors, distorts, or softens excessively.
How do you post-heat a vinyl decal to improve adhesion?
Post-heating helps shaped vinyl hold its form; firm squeegee pressure establishes contact with the surface. Press the decal into place first, then make slow, even passes over sections stretched around curves or worked into recesses. Don’t heat the entire graphic automatically. If a bubble or wrinkle appears, stop and correct the vinyl’s placement rather than applying more heat over the defect.