

Did you know that a single microscopic scratch on your sapphire lens can trigger a repair bill of over $200 in 2026? It's a steep price for a momentary lapse in protection. Mastering how to install phone camera lens protector correctly is the only way to safeguard your device's optical integrity without sacrificing image quality. You've invested in a high-value tool for its precision. Now, you must act as its guardian to ensure that performance never fades.
We understand the frustration of trapped dust and the fear that a misaligned protector might ruin your next high-resolution photo. You deserve a setup that offers a seamless, invisible look without compromising on safety. This guide promises to help you master the art of bubble-free lens protection to preserve your smartphone’s optical clarity and resale value. We'll walk through the professional Zerodust preparation process, specific alignment techniques for a perfect fit, and the secrets to maintaining total light transmission for every shot you take. By the end of this tutorial, your IPG Phone camera lens protector will be perfectly seated, securing both your lens and your phone's future.
Key Takeaways
- Utilize the "steamy bathroom" environment to neutralize airborne micro-dust and create a professional-grade installation zone.
- Master exactly how to install phone camera lens protector using a dry-fit method to guarantee surgical alignment before any adhesive is activated.
- Learn the specialized "Lifting Technique" to safely extract trapped debris or air bubbles without compromising the integrity of the tempered glass.
- Verify case compatibility by checking for specific lip clearance to prevent 2026 flagship cases from causing protector lift or misalignment.
- Maintain 99.9% light transmission and professional photo clarity by leveraging IPG Zerodust technology and precision-engineered protective materials.
Setting the Stage: Preparing Your Workspace for a Flawless Install
Professional results begin long before the adhesive touches the glass. When you learn how to install phone camera lens protector, you quickly realize that static is your primary enemy. Avoid synthetic fabrics like polyester or fleece while working. These materials generate a charge that pulls airborne debris directly onto your lens housing. Opt for cotton or short sleeves. This simple choice reduces the risk of lint contamination before you even open your kit.
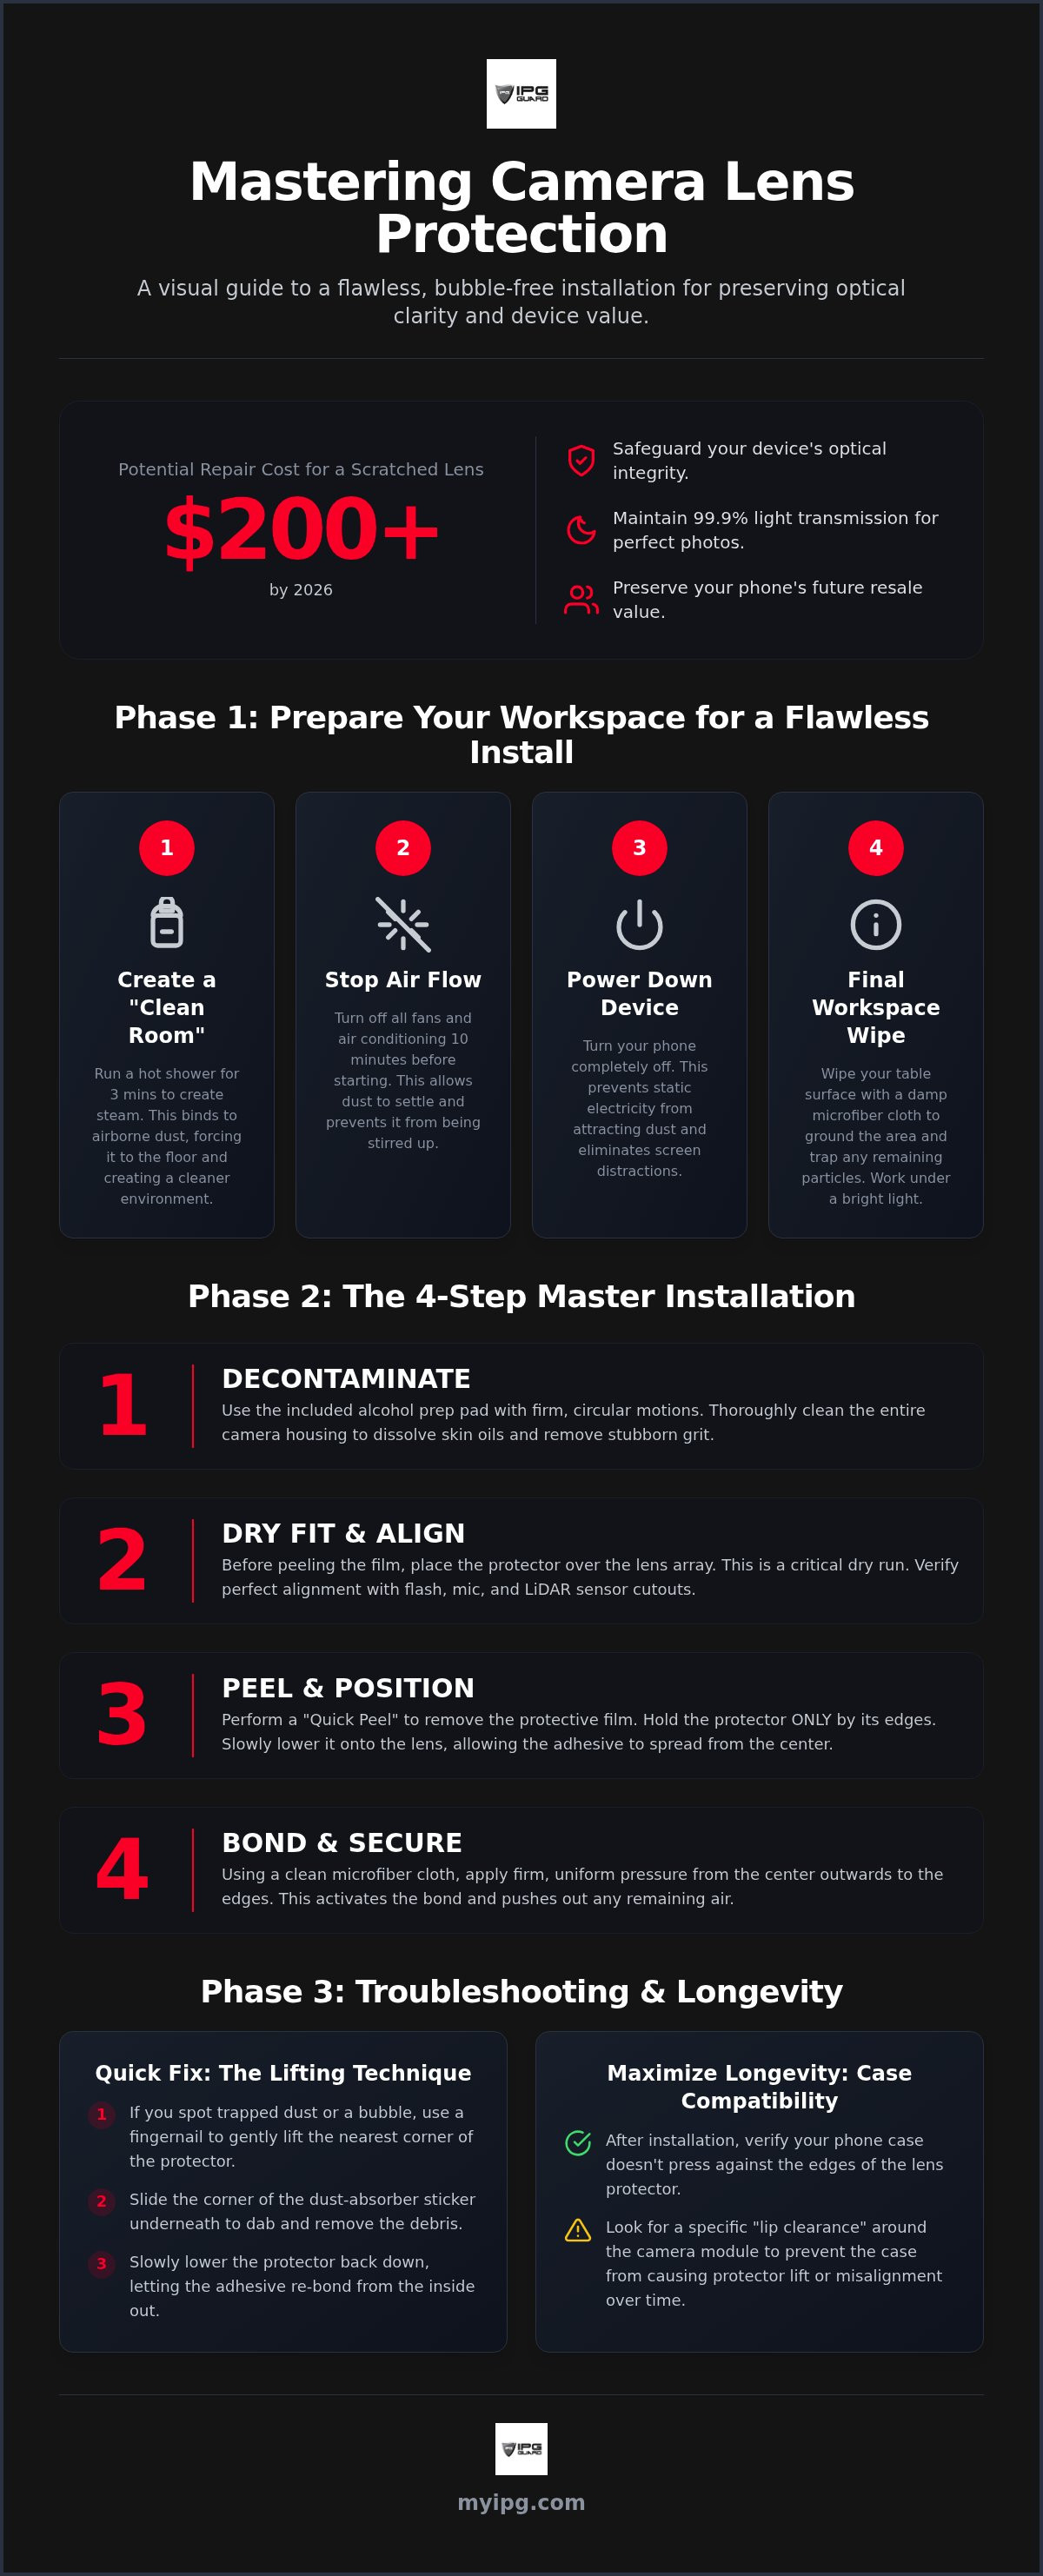
The "Steamy Bathroom" method is the industry's gold standard for dust control. Run a hot shower for three minutes until the room is slightly humid. Steam binds to floating particles, forcing them to the floor. This creates a temporary "clean room" environment. It is the most effective way to ensure a bubble-free result for your IPG Phone camera lens protector. Position yourself under a bright, direct light source. Side-lighting is best for revealing micro-shadows cast by dust. If you cannot see the dust, you cannot remove it.
The Clean Environment: Eliminating the Dust Factor
Airborne particles are relentless. Research shows they can settle on a cleaned surface in under three seconds. To prevent this, turn off all fans and air conditioning ten minutes before you start. This allows the air to become stagnant and heavy. Use a damp microfiber cloth to wipe down your immediate table surface. This "grounds" the area, preventing static from attracting lint toward your device. It is a small step that separates a professional installation from a frustrated DIY attempt.
Essential Tools: What is Inside Your IPG Kit
Your kit contains precision instruments designed for the stewardship of your technology. The professional-grade alcohol prep pad is vital. It dissolves stubborn skin oils and pocket lint that compromise the bond. Use the dust-absorber sticker with a light dabbing motion. This removes microscopic debris without leaving adhesive residue behind. Understanding screen protector materials helps you appreciate why absolute cleanliness is non-negotiable for high-transmission glass.
When handling the protector, identify the "Pull Tab" immediately. The side facing the tab is the application side. Never touch this surface with your fingers. Even a single fingerprint can cause permanent blurriness or light refraction issues. Keep the protector inside its protective sleeve until the exact moment of application. This meticulousness ensures your camera maintains its original optical clarity while gaining a fortress of protection.
The Master Class: Step-by-Step Phone Camera Lens Protector Installation
Execution is the bridge between protection and performance. Your workspace is prepped. The air is still. Now, you must translate that preparation into a perfect bond. When learning how to install phone camera lens protector, precision is your most valuable asset. This stage requires a steady hand and a methodical approach to maintain the optical integrity of your 2026 flagship device.
Step 1 & 2: Surface Decontamination and Alignment Prep
Begin by using the alcohol prep pad to dissolve lipid-based smudges and oils. Apply firm, circular motions to ensure the edges of the lens housing are completely free of grit. Even a single grain of pocket lint can compromise the vacuum seal. The Dry Fit is the most critical step for 2026 multi-camera arrays, serving as your final check to ensure every sensor remains unobstructed before the adhesive is committed. Position the glass over the array. Verify that the flash and microphone cutouts align perfectly. This ensures you know how to install phone camera lens protector without blocking the LiDAR sensors or the secondary noise-canceling mic.
Step 3 & 4: Peeling, Positioning, and the Soft Press
Perform the "Quick Peel" by removing the protective film from the adhesive side. Hold the IPG Phone camera lens protector strictly by its outer edges to avoid fingerprinting the internal surface. Learning how to install a screen protector bubble-free requires rapid execution to minimize the window for dust intrusion. Lower the protector slowly. Allow the adhesive to spread naturally from the center outward. This allows air to escape through the perimeter. Once seated, use a clean microfiber cloth to apply uniform pressure around the edges. This activates the bond and ensures a seamless, gap-free fit.
Allow the device to sit undisturbed for at least 15 minutes. This curing time allows the adhesive to settle into the micro-textures of the lens housing. For the most secure bond, consider a precision-cut IPG Phone camera lens protector designed for a zero-tolerance fit. A final inspection under bright light should reveal a crystal-clear surface with no visible edges or trapped air. Your lens is now a fortified imaging tool.
Troubleshooting: How to Fix Bubbles, Dust, and Misalignment
Seeing a speck under your newly applied glass is frustrating. You must first identify the culprit. Air bubbles appear as clear, reflective voids that move under pressure. Dust bubbles have a solid, opaque center and remain stationary. Understanding this distinction is vital when learning how to install phone camera lens protector successfully. If it is just air, patience is often your best tool. If it is dust, you need a tactical intervention to restore the optical path.
The Lifting Technique is your primary recovery method. Use a thin plastic card to gently elevate a single corner. Never use your fingernail. Nails introduce skin oils and can chip the edges of tempered glass. Lift only as much as needed to reach the debris. If the adhesive layer looks cloudy or "milky" across more than 30% of the surface, the bond is likely compromised. In this case, a fresh IPG Phone camera lens protector is the only way to ensure 2026-standard optical clarity for your high-value sensors.
The Air Bubble Solution: From Edge to Center
Most modern adhesives feature slight oxygen permeability. Small perimeter bubbles often dissipate naturally within 24 hours as the air is absorbed or pushed out by the settling glass. For stubborn gaps, use a squeegee or a credit card wrapped in a microfiber cloth. Work from the center toward the nearest edge with firm, steady strokes. If the bubble resists, try the "Heat Trick." Use a hairdryer on its lowest setting for five seconds from a distance of six inches. This slightly softens the silicone adhesive, allowing it to flow into the micro-gaps of the lens housing for a permanent, invisible seal.
Dealing with Trapped Dust: The Tape Rescue
The "Dust-Hiker" method is the secret of professional technicians. If a particle is trapped, use one piece of clear tape to lift the edge of the protector. While holding it up, use a second piece of tape, looped sticky-side out, to "fish" for the dust on the adhesive side of the glass. This snagging motion removes the debris without you ever touching the silicone. This preserves the integrity of the IPG Zerodust technology and prevents further contamination. Once the particle is removed, let the glass fall back into place. This surgical approach saves the install and maintains the stewardship of your device's imaging capabilities.
Maximizing Longevity: Case Compatibility and Daily Maintenance
Securing your device is a long-term commitment. Even if you know how to install phone camera lens protector perfectly, a poorly fitted case can ruin the bond in seconds. This is the "Case Conflict." Modern 2026 flagship cases often have a raised lip that protrudes 3 to 4 millimeters. If this lip is too tight, it will exert lateral pressure on the glass. This forces the adhesive to lift, creating an entry point for dust. Always check for "Lip Clearance" before final assembly. You need a small gap to ensure the case doesn't interfere with the protector's footprint. This simple check preserves the stewardship of your high-value optics.
The Compatibility Checklist: Protector vs. Armor
Thickness is the deciding factor for a seamless fit. High-quality tempered glass usually ranges between 0.2mm and 0.4mm. While hydrogel is thinner, tempered glass offers superior impact resistance for the protruding lens arrays of 2026 devices. Individually capped protectors are often the best choice for rugged, tight-fitting cases. They fit over each lens separately rather than covering the entire block. This modular design avoids interference with the case's camera cutout and reduces the risk of the case popping the protector off during a drop. For a complete strategy on device safety, consult The Ultimate Screen Protector Guide to ensure every sensor is covered correctly.
Optical Clarity: How to Clean Your Lens Protector Safely
Maintaining the oleophobic coating is essential for smudge-free photography. Never use window cleaner or ammonia-based products like Windex on your camera. These harsh chemicals strip the protective layers, leaving your glass vulnerable to permanent oil stains. The "Fog Breath" method is a safe, chemical-free way to lift light dust. For deeper cleans, use a specialized lens cleaner and a clean microfiber cloth. Gently wipe in a circular motion to remove fingerprints without scratching the surface.
Signs that it's time to replace your IPG protector include visible micro-cracks, edge lifting, or a cloudy appearance that doesn't disappear after cleaning. These symptoms indicate that the structural integrity of the glass or the adhesive has failed. In the high-stakes world of mobile photography, a damaged protector causes lens flare and light artifacts that even advanced AI processing cannot fix. Ensure your next upgrade is a precision-engineered IPG Phone camera lens protector to maintain peak performance and protect your device's resale value.
Beyond the Glass: Why IPG Technology Redefines Lens Security
Your smartphone is no longer just a communication device. In 2026, flagships like the iPhone 17 Pro Max function as professional-grade imaging systems. We believe in the stewardship of this technology. IPG treats your mobile camera with the same reverence a photographer shows a professional DSLR. Generic solutions often fail because they treat every lens the same. We don't. Knowing how to install phone camera lens protector is only half the battle. The other half is choosing a component that respects the engineering of your device.
Universal protectors are often cut from low-grade PET that distorts light. IPG custom-fit protectors are mapped to the exact micron of your specific camera array. This precision ensures that the LiDAR sensors, microphones, and flash modules operate without interference. Our glass achieves 99.9% light transmission. This means your high-resolution sensors receive the full spectrum of data they need for computational photography. Sharpness remains absolute. Colors stay true. You get the protection you need without the "ghosting" or lens flare common in cheaper alternatives.
Choice depends on your lifestyle. Tempered glass is the definitive choice for impact resistance, offering 9H hardness to deflect scratches from keys and coins. If you are also looking to upgrade your personal care toolkit, you can explore Direct-to-Consumer Product Sales for trending beauty and wellness accessories from Iridescent Glow. For those with curved camera modules or who prefer a seamless, invisible profile, the IPG Original Hydrogel line provides flexible, edge-to-edge coverage. IPG ProActive technology filters glare for better outdoor photography by managing light refraction before it hits the sensor. This specialized material ensures that even in harsh sunlight, your images maintain deep contrast and vivid detail.
We map the latest sensors from Apple and Samsung to ensure zero-interference with autofocus and depth-sensing capabilities. Our brand persona is that of a guardian. We prioritize the preservation of your most valued tools. When you master how to install phone camera lens protector using our Zerodust kits, you are partnering with a specialist dedicated to your experience. Secure your lenses with an IPG Phone camera lens protector today and ensure your device remains in factory-perfect condition for years to come.
Securing the Future of Your Mobile Photography
Your smartphone represents a significant investment in both technology and personal memory. Mastering how to install phone camera lens protector ensures that your 2026 flagship device remains a high-performance imaging tool. Success lies in the meticulous preparation. By controlling your environment and utilizing precision alignment techniques, you eliminate the risks of dust and distortion. You aren't just applying glass; you're acting as a guardian for your device's optical soul. This level of stewardship maintains your device's resale value while ensuring your creative output never suffers from unwanted artifacts.
IPG provides the ultimate defense with 99.9% light transmission and proprietary Zerodust installation technology. Our protectors are precision-cut for the latest iPhone 17 and Samsung S26 arrays, offering a seamless fit that preserves every detail of your high-resolution captures. Don't leave your sensors vulnerable to the hazards of daily use. Protect your professional optics with an IPG Camera Lens Protector today. Your future photos will reflect the meticulous care you take now. Stay confident in your gear and keep shooting with absolute clarity.
Frequently Asked Questions
Do camera lens protectors affect the quality of my photos or video?
High-quality protectors with 99.9% light transmission ensure your photos and videos remain sharp and color-accurate. Low-grade plastic alternatives can cause lens flare, ghosting, or "milky" images. Precision-engineered glass maintains the original refractive index of your device's sensors. Always check for oleophobic coatings to prevent fingerprint smudges from blurring your shots. By using professional-grade materials, you safeguard your optics without sacrificing the computational photography capabilities of your 2026 flagship.
How do I remove air bubbles from my camera lens protector after installation?
Use a microfiber-wrapped credit card to gently push air bubbles toward the nearest edge. Most microscopic bubbles disappear naturally within 24 hours as the silicone adhesive settles. If a bubble persists, it might be trapped dust. In that case, you must learn how to install phone camera lens protector using the "Lifting Technique" mentioned earlier. Gently lift the edge with a thin plastic tool and use a dust-absorber sticker to remove the debris.
Can I still use my phone case with a camera lens protector installed?
Yes, provided your case has sufficient lip clearance around the camera array. Most 2026 flagship cases are designed with a 3mm to 4mm protrusion to protect the lenses. Individually capped protectors offer the best compatibility for rugged or tight-fitting cases. Always perform a dry fit before final application to ensure the case doesn't exert lateral pressure. This prevents the adhesive from lifting at the corners and maintains a permanent, secure seal.
What is the best way to remove a cracked camera lens protector safely?
Use a thin plastic opening pick or a credit card to gently lift one corner of the cracked glass. Work slowly to prevent the protector from shattering further. Once the edge is raised, slide the card underneath to break the adhesive bond across the entire surface. Never use your fingernails or metal tools, as these can scratch the sapphire lens or the surrounding housing. Clean the residue with an alcohol prep pad before applying a replacement.
Is tempered glass better than hydrogel film for protecting camera lenses?
Tempered glass is superior for impact resistance and scratch protection due to its 9H hardness rating. It deflects direct strikes that could shatter your sensors. However, the IPG Original (Hydrogel) Screen Protector is the better choice for curved modules or users seeking an invisible, ultra-slim profile. Hydrogel offers excellent scratch resistance and self-healing properties. Choose tempered glass if you prioritize rugged defense against drops and heavy-duty daily wear on your device.
How long does the adhesive on a camera lens protector take to fully cure?
Initial adhesion occurs immediately upon contact, but the bond requires 15 to 20 minutes to settle undisturbed. For a full cure, wait 24 hours before exposing the device to extreme temperatures or moisture. This period allows the silicone adhesive to flow into the micro-textures of the lens housing. Avoid placing your phone in tight pockets or using rugged cases during the first hour. Proper curing ensures the longevity and stability of your protection.
Will a lens protector interfere with the flash or LiDAR sensor on my iPhone?
Precision-cut protectors include specific cutouts for the flash, LiDAR sensor, and noise-canceling microphones. These openings prevent light bleed and sensor interference. If the protector covers these elements, it can cause "flash flare" or slow autofocus in low light. When you understand how to install phone camera lens protector correctly, you align these cutouts perfectly. IPG custom-maps every sensor array to guarantee that your iPhone’s advanced depth-sensing and lighting features remain fully functional.
How often should I replace my phone camera lens protector?
Replace your protector immediately if you notice cracks, deep scratches, or edge lifting. These issues compromise the structural integrity and allow dust to infiltrate the adhesive layer. If the glass appears cloudy or has "rainbow" artifacts that don't clean off, the oleophobic coating has likely worn away. Inspect your camera housing every three months. Fresh protection ensures your 2026 device maintains its peak optical performance and high resale value over its entire lifecycle.