

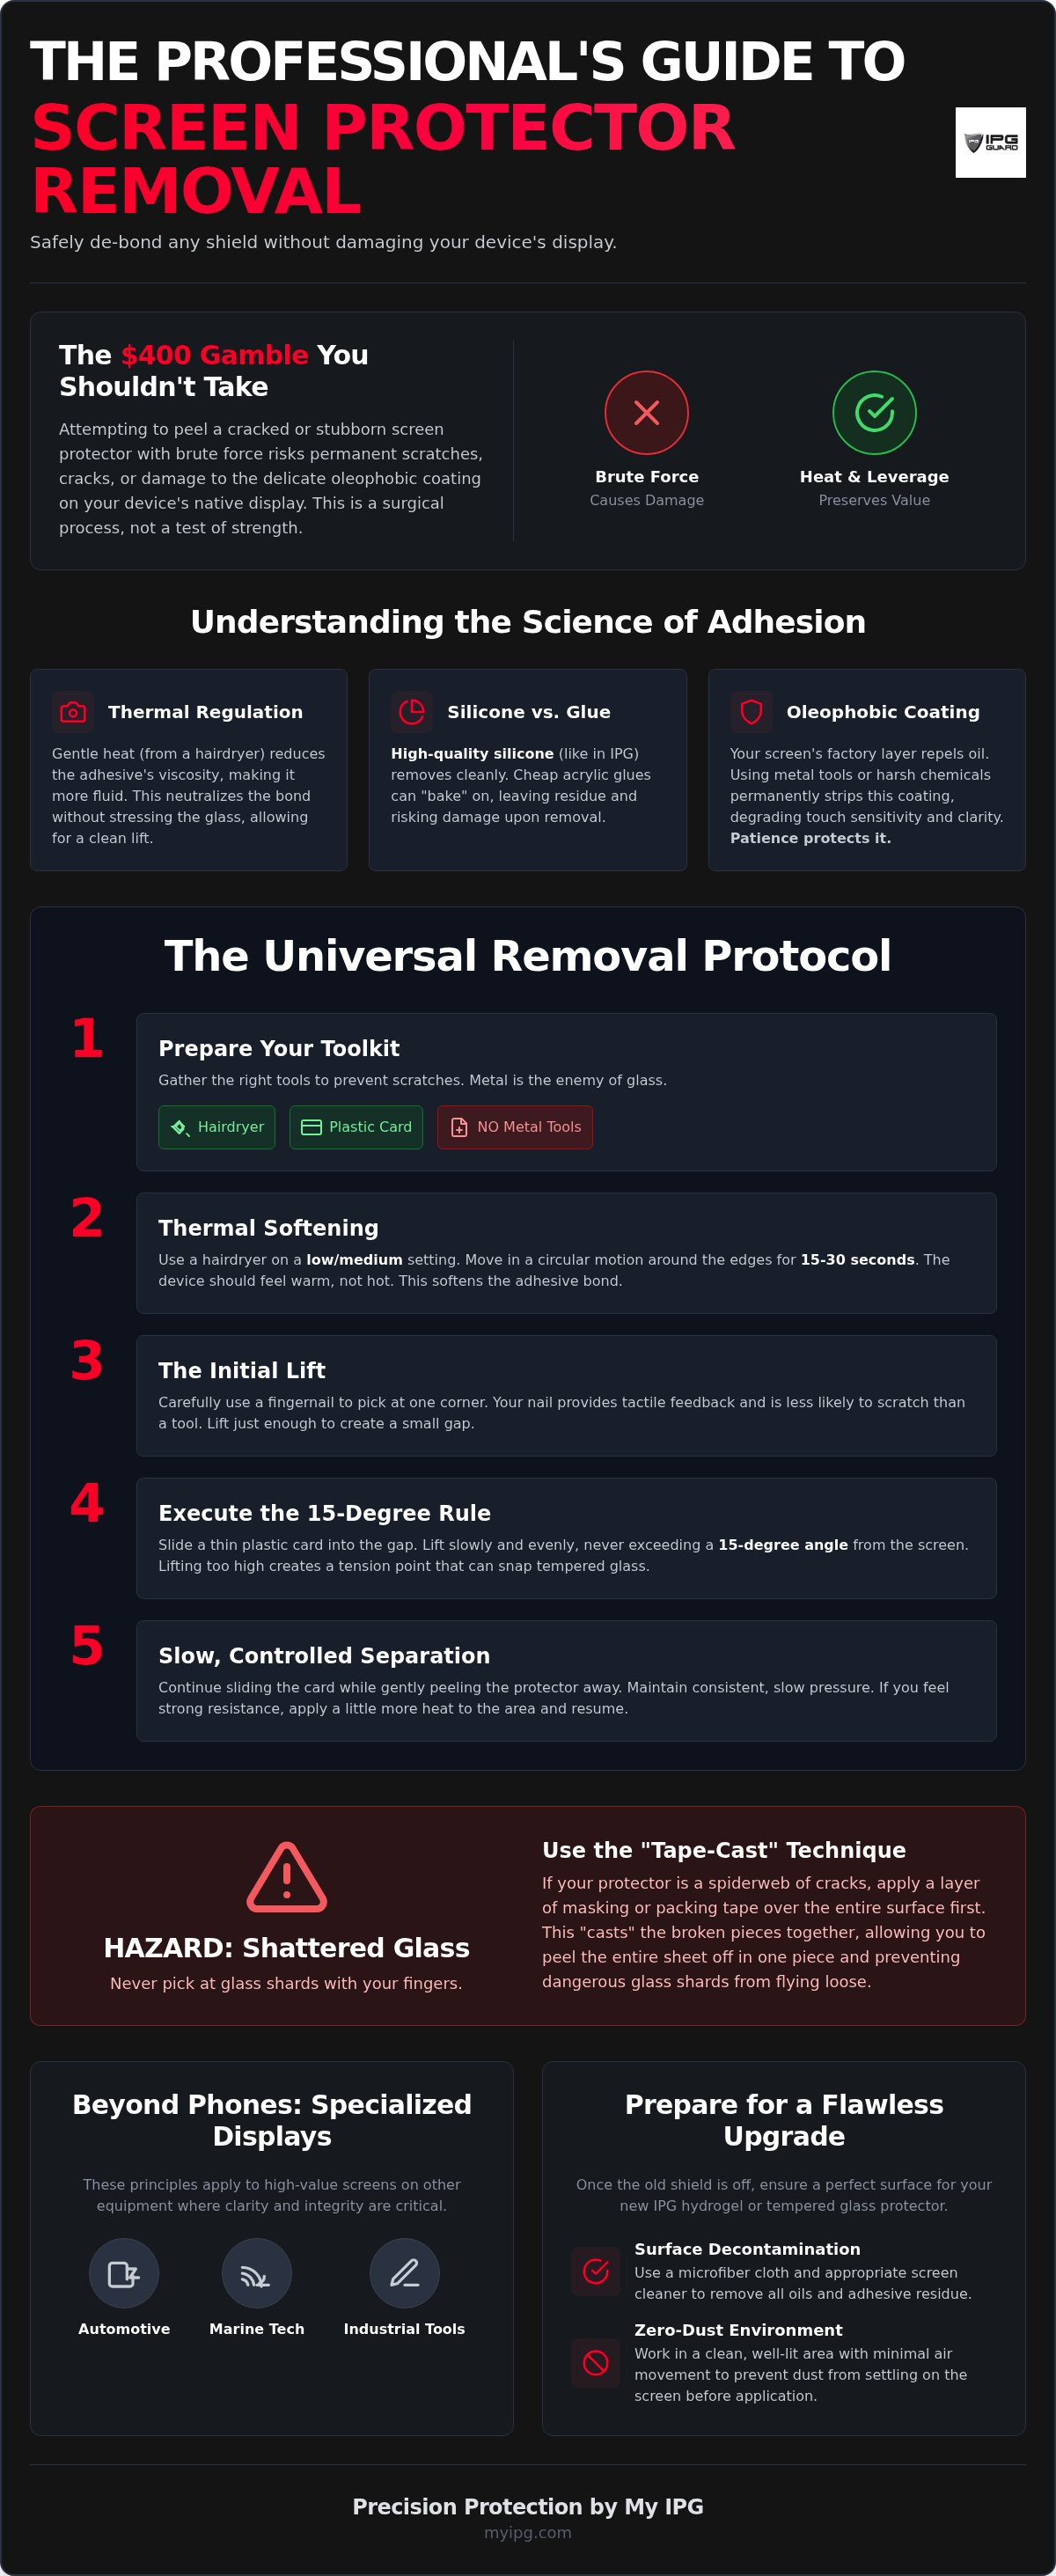
Peeling back a shattered screen protector with your bare hands isn't just a risk to your fingertips; it's a $400 gamble with your device's native display. Modern smartphone screens are precision-engineered marvels, yet they remain vulnerable to the very tools often used to "fix" them. You likely feel the urge to just pick at that loose corner, but stop. Learning how to remove screen protector without damage is a surgical process of heat and leverage, not brute force. Whether you're dealing with a spiderweb of cracked tempered glass or a stubborn film on a curved OLED, the goal is total preservation of the original glass.
We understand the anxiety of seeing your high-value tech compromised by cracks or peeling edges. You want a pristine, residue-free surface ready for a fresh layer of security. This guide provides the professional methodology required to safely lift old shields without leaving a single scratch. We will walk through the essential tools, the physics of adhesive release, and the specific steps to prepare your device for a premium My IPG hydrogel or tempered glass upgrade. Let's restore your screen's integrity with the precision it deserves.
Key Takeaways
- Understand how thermal regulation neutralizes silicone-based adhesives, allowing for a clean lift without stressing the glass substrate.
- Execute the specialized 5-step protocol on how to remove screen protector without damage to maintain the high resale value of your device.
- Utilize the "Tape-Cast" technique to safely manage shattered tempered glass shards and protect your fingers during the removal process.
- Identify the specific requirements for safely lifting shields from specialized automotive displays and ruggedized industrial diagnostic tools.
- Prepare your device for a flawless IPG hydrogel or tempered glass upgrade by mastering surface decontamination and zero-dust environment setup.
The Science of the Bond: Why Protectors Stick
Understanding the chemistry behind your screen's shield is the first step toward a safe upgrade. Most users attempt to pull a protector off blindly; this is how displays get ruined. The "grip" holding that glass or film in place isn't just glue. Most aftermarket shields rely on a Pressure-sensitive adhesive (PSA) to stay in place. This material doesn't require a solvent to stick; it requires force. Over months of use, the bond between the protector and your device matures, creating a tight seal that resists lifting.
Heat is the specialist's best friend in this process. When you apply gentle, controlled warmth, you reduce the viscosity of the adhesive layer. In simpler terms, heat makes the "sticky" part more fluid and less like a solid grip. This is vital for how to remove screen protector without damage. By softening the bond, you allow the protector to lift away with minimal tension, preventing the original glass from undergoing unnecessary stress or micro-fractures.
Silicone vs. Glue-Based Adhesives
Modern high-end protectors, such as the IPG Original (Hydrogel) Screen Protector, utilize a specialized silicone adhesive layer. Silicone is preferred because it's "self-healing" during installation and leaves zero gummy residue upon removal. In contrast, cheaper, generic protectors often use acrylic-based glues. These low-quality adhesives can "bake" onto your screen after prolonged exposure to UV light and device heat. Adhesive curing refers to the chemical transition of a bonding agent from a semi-solid state into a permanent, hardened layer over time. Once a cheap adhesive cures fully, removing it without specialized techniques becomes a significant risk to your hardware.
Preserving the Oleophobic Layer
Your device's factory screen features an oleophobic coating, a thin layer designed to repel finger oils and maintain smooth touch sensitivity. This layer is delicate. Using metal blades, kitchen knives, or harsh chemicals to force a protector off can permanently strip this coating. You'll know your coating is compromised if fingerprints become impossible to wipe away or if water no longer beads on the surface. To protect this vital feature, always use plastic prying tools and microfiber materials. Precision and patience are the only ways to ensure your display remains as responsive as the day you unboxed it.
The removal technique also shifts based on the material of the protector. A tempered glass shield is rigid; it requires a slow, even lift from a single corner to prevent it from snapping into dangerous shards. A hydrogel film, like the IPG ProActive series, is flexible. It won't shatter, but it can stretch or tear if pulled too quickly, leaving stubborn fragments behind. Regardless of the material, the goal remains the same: a clean, surgical separation that leaves the host device in factory condition.
The Universal Removal Protocol: 5 Steps to Safety
Safe removal requires a surgical mindset. You aren't just peeling plastic; you're de-bonding a specialized adhesive from a high-value display. To begin, gather your toolkit: a standard hairdryer, a thin plastic card (like a credit card), a microfiber cloth, and a roll of masking tape. Avoid metal tools. Metal is the enemy of glass and will lead to permanent gouges. Mastering how to remove screen protector without damage starts with this controlled, non-abrasive environment.
Step 1 & 2: Preparation and Thermal Softening
Heat is your primary lever. Never use a high-powered heat gun; these industrial tools reach temperatures that can delaminate your screen or damage internal battery cells. Stick to a standard hairdryer on a low or medium setting. Target the edges of the protector specifically, as this is where the bond is strongest. Move the hairdryer in a slow, circular motion for 15 to 30 seconds. Conduct a safety check: if the device feels uncomfortably hot to your touch, stop immediately and let it cool for a minute. You want the adhesive to reach a state of low viscosity, not to melt the device's internal components.
Step 3 & 4: The Lifting Technique
Once the bond is softened, find the weakest point. Your fingernail is often the safest tool for the initial lift because it provides tactile feedback that a plastic tool cannot. Gently pick at a corner until a small gap appears. Avoid the urge to pull upward. Instead, slide your plastic card into the gap to maintain even pressure across the surface. Follow the 15-degree rule: never lift the protector higher than a 15-degree angle from the screen. Lifting too high creates a tension fulcrum that causes tempered glass to snap. For particularly stubborn or hardened glass, industry experts often recommend specialized removal techniques to ensure the substrate remains intact.
Step 5: Final Surface Clearing
After the protector is off, you will likely see a "ghost" of adhesive residue. Use a microfiber cloth dampened with 70% isopropyl alcohol to wipe the surface. Avoid soaking the screen; a light dampness is sufficient. For microscopic adhesive spots or stubborn dust, use the "tape-dab" method. Wrap a piece of masking tape around your finger with the sticky side out and lightly tap the affected areas. This lifts debris without rubbing it into the glass. Once the surface is decontaminated, your device is ready for a fresh application of precision-cut IPG shields. For a deeper look at long-term maintenance, consult The Ultimate Screen Protector Guide: Safeguarding Every Display in 2026 to ensure your tech remains in factory condition.
Handling the Hazard: Removing Shattered Tempered Glass
Removing a compromised protector isn't just about aesthetics; it's a safety operation. When tempered glass shatters, it creates thousands of microscopic "stress points" across the surface. These shards are sharp enough to slice skin and small enough to migrate into your device's sensitive ports or speaker grilles. Before you begin, put on eye protection. A stray shard under tension can easily pop upward during the lifting process. Mastering how to remove screen protector without damage becomes significantly more complex when the glass is already compromised, requiring a specialized approach to containment.
The Tape-Cast Safety Technique
Never attempt to peel a "spiderwebbed" screen protector piece by piece. This increases the risk of scratching the underlying display with loose glass fragments. Instead, use wide, clear packing tape to create a "tape-cast." Lay overlapping strips of tape across the entire surface of the broken protector, ensuring it extends slightly past the edges. Press down firmly to ensure every loose fragment adheres to the tape. This binds the dozens of individual pieces into a single, flexible sheet that you can lift as one unit. Even with integrated shatter-proof films, high-velocity impacts can exceed the tensile strength of the bonding layer, causing glass fragments to detach from the substrate. The tape-cast acts as your secondary fail-safe, keeping the hazard contained while you use the 15-degree lift method described in the previous section.
Cleaning the Crevices
Once the main sheet is removed, your job isn't finished. Microscopic glass dust often lingers in the small gap between the screen and the device bezel. Do not use compressed air. While it's a common tech tool, compressed air acts like a propellant for tiny glass knives, potentially blasting them deeper into the phone's internals or your own eyes. Instead, follow these steps for a deep decontamination:
- Soft-Bristled Toothbrush: Use a dry, clean toothbrush to gently sweep out the perimeter of the screen. Hold the device upside down so gravity pulls the dust away from the ports.
- Micro-Adhesive Dabbing: Use a small piece of folded masking tape to dab the speaker grilles and charging ports. This safely captures dust that wipes might miss.
- Bezel Inspection: Run your microfiber cloth along the edges. If it snags, a tiny shard is likely still embedded. Use a plastic toothpick to dislodge it safely.
Carefully inspecting the bezel is vital. The initial impact that shattered your protector may have also caused slight frame deformation. Ensuring the perimeter is perfectly clean and smooth is the only way to guarantee your next IPG shield achieves a bubble-free, edge-to-edge seal. A clean surface is the foundation of long-term security and maintains the high resale value of your hardware.
Specialized Screens: Cars, Marine Tech, and Industrial Tools
Removing a protector from a $40,000 vehicle or a $5,000 diagnostic tool requires a different tactical approach than a smartphone. The sheer surface area and specialized coatings on these devices increase the margin for error. If you are wondering how to remove screen protector without damage on large-format displays, you must first acknowledge the "No-Heat" rule. Unlike mobile devices, automotive and industrial screens often feature integrated anti-glare matte layers that are sensitive to thermal stress. Excessive heat can cause these factory coatings to delaminate or discolor, resulting in a permanent, costly blemish.
Tesla and EV Navigation Screens
The 15.6-inch display in a Tesla Model 3 or a BYD Seal presents a unique challenge: leverage. Because the glass is so wide, lifting from a single corner creates a massive tension arc that can snap the protector mid-peel. We recommend a "dual-card" lift method. Once you have initiated the corner lift with a fingernail, slide two plastic cards underneath. Move them in tandem across the screen to support the center of the protector as it detaches. This prevents the shield from bowing and protects the delicate anti-glare film underneath. For more insight on choosing the right replacement, see our Car Screen Protector Buying Guide 2026: Shield Your Infotainment System.
Rugged Industrial Tools (Snap-on/Autel)
Diagnostic HMIs like the Snap-on Triton or Autel MaxiSYS operate in grease-heavy environments. Before attempting a removal, you must degrease the perimeter of the screen with a mild electronic-safe cleaner. Grease acts as a lubricant that prevents your tools from getting a secure grip, often leading to slips that gouge the screen bezel. Once the edges are clean, follow the standard lift protocol. Maintaining the touch sensitivity of these precision tools is vital for shop efficiency, so ensure no residue remains before applying a new ruggedized shield.
Marine and Outdoor Gear
Marine electronics, such as Lowrance Eagle or Garmin Descent units, face the dual threat of salt and sun. Salt crystals are highly abrasive; if they are trapped under the edge of the protector during removal, they will scratch the screen. Always perform a fresh-water rinse and thorough dry before starting. For motorcycle clusters like those on Harley-Davidson displays, adhesives can become "sun-baked" and brittle. Patience is key here. Move slowly to ensure the old adhesive doesn't pull up fragments of the plastic display lens. After a successful removal, ensure your high-value gear is ready for the elements by installing a precision-cut IPG screen protector designed for extreme durability.
Post-Removal: Preparing for Your Next IPG Shield
Mastering how to remove screen protector without damage is a significant victory for any tech owner, but the process isn't complete until the display is restored to factory-grade purity. Once the old shield is gone, your display is at its most vulnerable. Even a screen that appears clean often harbors microscopic oils, skin cells, and lint fibers that will compromise the bond of your next protector. Achieving a flawless finish requires a controlled environment and a methodical approach to surface decontamination before your new guardian takes over.
Achieving a Pristine Surface
Professional installers frequently utilize the "Steam Method" to create a temporary zero-dust zone. Run a hot shower in a small bathroom for 2 to 3 minutes until the air becomes slightly humid. This moisture grounds airborne dust particles, preventing them from drifting onto your display during the critical seconds of the new application. After the air has settled, use a fresh microfiber cloth to clear any remaining ghosting residue. While standard masking tape works for lifting large particles, specialized dust-removal stickers are superior. These stickers use a low-tack adhesive that captures microscopic debris without leaving a new layer of film behind. Conduct a final inspection under a bright, angled light source to ensure no "invisible" residue remains; even a single fingerprint can cause persistent bubbling under a fresh shield.
Upgrading to IPG Protection
If your previous protector was a standard tempered glass model that shattered, transitioning to an IPG Original (Hydrogel) Screen Protector is a logical upgrade. Unlike rigid glass that cracks under localized pressure, our specialized ProActive hydrogel technology utilizes a flexible, multi-layered polymer. This material is engineered to absorb and disperse impact energy, making it the ideal solution for high-traffic devices and curved displays like the Samsung Galaxy series or Tesla infotainment screens. The self-healing properties of the hydrogel mean that minor scuffs and surface indentations disappear within 24 to 48 hours, maintaining a crystal-clear view long after a glass protector would have failed.
Custom-fit precision ensures that your new guardian covers every millimeter of the display, providing edge-to-edge security that universal cut-outs simply cannot match. Before you peel the final layer of your new IPG shield, run through this final checklist: ensure the room is still, the surface is decontaminated, and your alignment is pixel-perfect. Learning how to remove screen protector without damage was the first step; now, you are ready to provide your technology with the specialized protection it deserves.
Restore Your Device's Factory Integrity
You have successfully mastered the specialist's approach to safe device maintenance. By applying controlled thermal regulation and the 15-degree glide technique, you've navigated the complexities of how to remove screen protector without damage. Whether you cleared a spiderwebbed phone screen or a large-format automotive display, your hardware is now a clean slate. Technical meticulousness is the only way to preserve the high resale value and touch sensitivity of your most valued items.
Now that your screen is decontaminated, it's time to upgrade your security. Secure your device with a precision-cut IPG Shield today. We offer specialized protection for Tesla, Snap-on, and Garmin displays using our advanced ProActive hydrogel technology. This self-healing, impact-resistant barrier ensures your tech remains in factory condition. With global shipping available for all electronic models, your next layer of defense is ready. Protect what you value and move forward with confidence.
Frequently Asked Questions
Will removing a screen protector scratch my actual screen?
Removing a protector will not scratch your screen if you use non-abrasive tools like a plastic card or your fingernail. Metal objects are the primary cause of damage during this process. By following the 15-degree lift rule, you ensure the original glass remains pristine and ready for a fresh IPG shield. Stewardship of your device requires patience and the right plastic-based levers.
Can I reuse a screen protector after I take it off?
You cannot effectively reuse a screen protector once it has been removed. Lifting the protector compromises the silicone adhesive layer and allows microscopic dust to settle on the sticky surface. Tempered glass also loses its structural integrity and is likely to snap if bent during a second application attempt. For the best performance and clarity, always start with a fresh, precision-cut shield.
What is the best way to remove sticky residue left behind by a screen protector?
The most efficient way to clear stubborn residue is using 70% isopropyl alcohol and a clean microfiber cloth. Dampen the cloth slightly and wipe in a circular motion to dissolve the adhesive. For microscopic spots, the tape-dab method effectively lifts particles without spreading them across the display. This decontamination phase is essential for ensuring your new protector achieves a bubble-free, permanent bond.
Do I really need to use a hairdryer to remove a tempered glass protector?
Using a hairdryer is the most effective strategy for how to remove screen protector without damage. Gentle heat softens the adhesive bond, which significantly reduces the mechanical stress on your device's native glass. This step is particularly vital for older protectors where the adhesive has cured over time, making it brittle and prone to snapping during a dry lift.
How do I remove a screen protector that doesn't have any loose corners?
Use a piece of strong packing tape to create a pull tab on one corner if no edges are loose. Press the tape firmly onto the corner and pull upward gently after heating the area for 20 seconds. This provides the necessary leverage to initiate the lift without needing to pick at the glass with sharp tools. It's a safer alternative to using harmful metal implements or risking your fingernails.
Is it safe to use a razor blade to lift the edge of the protector?
Never use a razor blade or any metal tool to lift the edge of a protector. Metal is harder than the oleophobic coating on your screen and will leave permanent, deep gouges. Stick to plastic cards or your fingernails to maintain the stewardship of your high-value technology and preserve its resale value. Precision and safety should always take priority over speed when handling your display.
What should I do if my screen protector is shattered into tiny pieces?
Apply the tape-cast method by covering the entire shattered surface with wide packing tape before attempting removal. This binds the fragments into a single flexible sheet, preventing shards from falling into ports or cutting your skin. Once bound, you can lift the entire unit safely using the standard 15-degree protocol. This containment strategy is the specialist's way to handle high-risk, spiderwebbed glass damage.
How soon can I apply a new screen protector after removing the old one?
New protection can be applied as soon as the display is dry and free of debris. This final stage is the ultimate goal of how to remove screen protector without damage. After cleaning with isopropyl alcohol, wait approximately 30 seconds for full evaporation. Perform one last inspection under a bright light to ensure a pristine surface for your new IPG ProActive shield.